• Home
  • About
    • About Me
    • Contact Me
  • Etsy Shop
  • Link Parties/Featured
    • I’ve Been Featured
    • Sweet Inspiration Link Party
  • Personal Diary

Vintage Southern Picks

Cheapskate Picker Sharing Finds, DIY & Selling Tips

Facebook   Twitter   Pinterest   Google+   RSS
  • DIY Projects
    • DIYs to Sell
    • Holiday/Seasonal
    • Home and Garden DIY
  • Home and Garden
    • Home Organization
    • How I Organize My Ebay/Etsy Home Office
    • Home Tours
    • Party Games
  • Selling Tips
    • Buys I Avoid
    • Shipping
    • What’s Selling on Etsy/Ebay
    • Yard Sales
      • How to Give a Yard Sale
      • What Not to Say in Yard Sale Ads
      • Yard Sale Humor
  • Vintage Finds
    • Thrift Store Finds
    • Mystery Items
    • Yard/Estate Sale Finds
    • Vintage Junk Giveaways
  • Disclosure Policy
  • Privacy Policy

Update a Brassy Desk Lamp with Paint and Scrapbook Paper

February 19, 2018 by Florence 52 Comments

Last weekend we rearranged a little furniture. Took pieces to the attic I was tired of, and brought new ones down. I wanted a desk in the Great Room where we spend most of our time, so we man-handled down a little handmade desk my aunt gave me years ago. In the process, I found this cute little desk lamp in the attic I had forgotten about.

The only thing is, it’s a bit overly shiny brassy, and the lampshade is boring, but the lamp is just the right size for the space.

brassy-lamp-needing-a-makeover

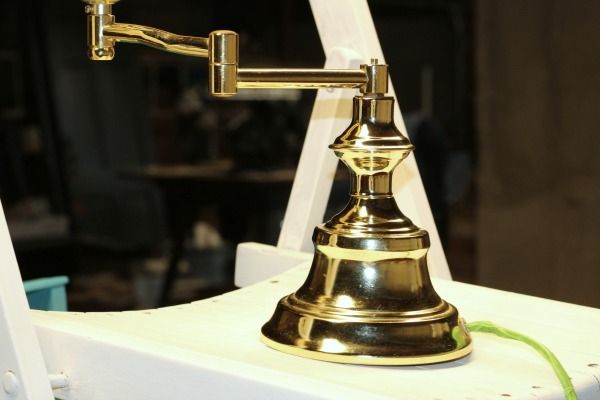
Since C’mon Get Crafty, or “Craft Room Destash,” as it was formerly called, was coming up, I thought about updating the brassy lamp with a bit of paint and scrapbook paper as my project for the month.

I have loads of scrapbook paper, napkins, old magazine pages I picked up free at a garage sale…lots of things with which to update the lamp, and give it a bit of shabby chic love.

craft-room-destash-challenge

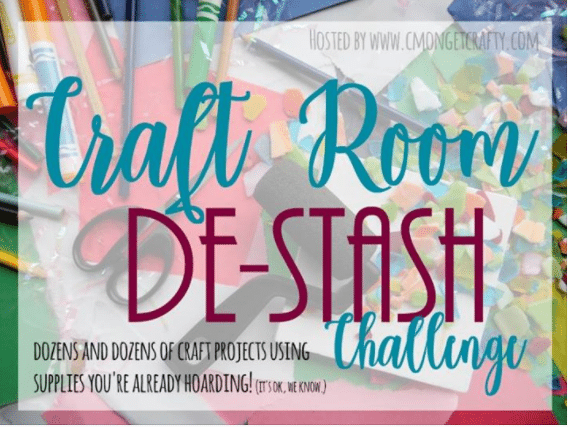
Before we get on with the project, here’s a little info about C’mon Get Crafty.

Every month a group of bloggers are challenged by C’mon Get Crafty to create a new craft or project from their own stash of goodies! Check out some awesome creations you might be able to make from your own stash! #CraftRoomDestashChallenge

[clickToTweet tweet=”What crafty creations could you make today from YOUR craft stash?! #CraftRoomDestashChallenge” quote=”What crafty creations could you make today from YOUR craft stash?! #CraftRoomDestashChallenge”]

If you’d like to join in the Craft Room De-Stash Challenge, you can request to join our Facebook group here!

How to Update a Brassy Desk Lamp with Paint and Scrapbook Paper

Painting the Lamp:

  1. Don the paint clothes
  2. Set up the high end paint station
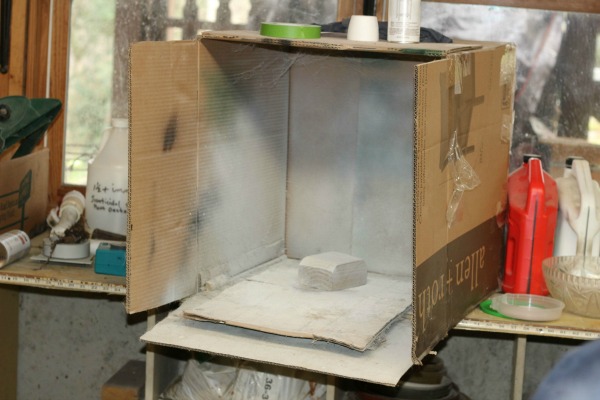
    high-end-paint-station
    High End Paint Station
  3. Use masking tape or Frog Tape to protect the parts of the lamp you don’t want painted
  4. Spray paint the lamp with primer first (I used Zinsser Primer). It dries very fast. I applied 2 coats.
  5. Follow with your main paint color. I used 2 coats Krylon Classic White Chalky Finish paint.

Updating the Lampshade

The lampshade was pretty ho-hum to begin with, and the pleats quite brittle from being exposed to years of attic heat. Trust me, the photo is much too flattering!

lampshade-before
Lampshade Before

The most time-consuming part of the project was making a template for the inside of the shade.

template-fitted-to-inside-of-shade

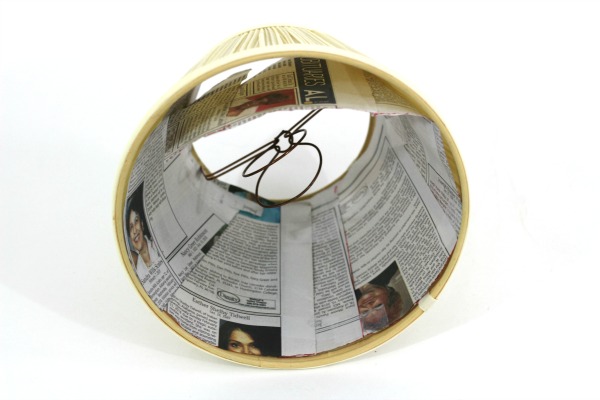
I did that by piecing together strips of newspaper around the inside of the shade to get the correct dimensions. Here’s the finished template.

a-look-at-the-paper-template-for-the-lampshade

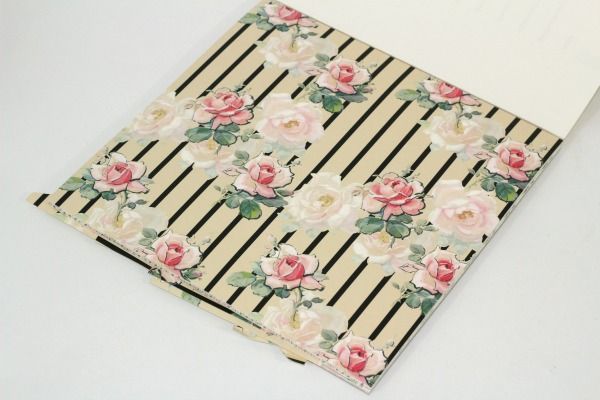
I found scrapbook paper I liked when I was fooling around one night trying to get a new look for the shade.

scrapbook-paper-i-loved

I was worried that stiff scrapbook paper wouldn’t adhere well to the inside of the shade, but it did.

It helped that there was a smooth plastic inner lining rather than lampshade fabric, which would not have worked.

Simply place your newspaper template on top of the scrapbook paper and trace around it, BUT…

TIP #1: Make sure that your design is right side up. (ask me how I know this.)

TIP #2: Make sure you’re tracing around the correct side of the paper.

TIP #3: The process is easier if you choose paper with a uniform design. 

Due to the square size of the scrapbook paper, the final lampshade liner was in 2 pieces, making it harder to match the design..

Once you have your 2 pieces and know where to line them up inside the shade, you’re ready for Mod Podge.

You need to work quickly, mod-podging the design side of the paper to the inner shade lining, which also should be mod-podged for good adherence.

Fit your new shade lining into the shade (and pray)!

As I told my husband, when I do a project, I want to do it perfectly. Ha! And this isn’t perfect. But it turned out a huge improvement over what was! The outside pleated shade gives a muted look to the paper and I really love it near my curtains.

finished-lamp

If needed, there are ways to disguise lampshade mistakes such as gluing on buttons, ribbons, or doilies so that they look intentional. I may glue some trim over the top and bottom rims of the shade for a bit of extra bling, but for now, I’m happy.

If you purchase of any of the products below, I earn a small commission to help support this blog, but you don’t pay a penny more. For more info, see my Disclosure Policy. 


Hope you enjoyed the post! Have you ever done a lampshade project? I’d love to hear about it in the comments.

Sharing with these link parties…

Be sure and check out the projects of my talented blogging pals below~

Before you go, here are 2 more favorite lampshade projects~

salvaging an expensive lampshade with mens ties

doily lampshade makeover

An InLinkz Link-up


Filed Under: Home and Garden DIY Tagged With: lamp DIY, lamp update, lampshade recovering, painting a brass lamp, relining a lampshade, repainting a brass lamp

Rescued Holiday Candoliers Get a Fun Makeover

January 25, 2018 by Florence 42 Comments

I’m going to tell you a little story about how Rescued Holiday Candoliers Get a Fun Makeover!

I usually buy these vintage plastic candolier sets when I go to yard or estate sales.

Believe it or not, they sell! In fact, a couple of years ago, I sold one of these bigger 8-candle sets to a person in Paris, France. The shipping alone was over $70 (!) because such a long candle set has to have a big box, putting it in the more expensive Priority Mail International category.

***Before you read any further, I wanted to mention this post is a part of the monthly Thrift Store Challenge. 

vintage-holiday-candolier-set
Original vintage Candolier set

The Rules:

  • Upcycle an item(s) from a thrift store, resale store, or garage sale into a new piece of decor.
  • There’s no monthly theme.
  • There’s no budget to stick to.

Meet the Hosts

Amanda | Domestically Creative – Pili | My Sweet Things
Angela | Simply Beautiful by Angela – Jeanie | Create and Babble
Molly | Just a Little Creativity 
Marie | The Inspiration Vault – Michelle | Michelle James Designs
Shirley | Intelligent Domestications – Dru | Polka Dot Poplars
Pam | P.S. I Love You Crafts – Gail | Purple Hues and Me
Jennifer | Cookies Coffee and Crafts – Toni | Small Home Soul
Sue | A Purdy Little House – Kathleen | Our Hopeful Home
Victoria | Dazzle While Frazzled – Marie | DIY Adulation Michelle | Our Crafty Mom – Debra | Shoppe No. 5
 Denise | My Thrifty House
Florence | Vintage Southern Picks – Ann | Duct Tape and Denim
Yamilette | The Latina Next Door – Maureen | Red Cottage Chronicles

Make sure you follow our board on Pinterest for more upcycled decor inspiration!


Before blogging, I sold through a booth getting lots of inspiration for projects from a blogger I loved. This candle project was inspired by Carol from ThePolkaDotCloset.com.

Back then I devoured everything Carol said, even though she warned that “what sold for her may not sell for you”. Sure enough, I was terribly disappointed my “Blinged Up Vintage Candoliers” didn’t sell. The now “duds” came home, were tossed in a box where they sat forgotten for 4 years.

blinged-up-vintage-holiday-candoliers
More Candolier Bling

During my latest post-Christmas purge, I found them again and plopped them quickly into the donation pile.  But as I recalled all the labor I went through for these masterpieces, I had second thoughts. I decided they might not be so “dud-ish” after all.

Maybe…just maybe I could rescue and use them!! That’s quite a revelation, you see, because I rarely keep anything I’ve bought for resale, even if I want it.

These Rescued Holiday Candolier Makeovers happened a few years ago before blogging, but I thought I would share with you how I revived them.

Basic Improvements for Vintage Holiday Candoliers

When I say “improvements,” if you’ve ever seen or handled these candolier sets, you know they’re flimsy and top heavy. They fall over constantly because they’re made of lightweight plastic with narrow bases. Some of the modern sets even come with suction cups so you can stick them to windows.

The Improvements:

  • I made up a solution of wet grout, adding it to the inside of the base. Believe me, it works wonders for these sets!
  • Allow to dry.
  • Then I covered the base with thin cardboard and felt to finish it.
  • Spray paint with color of your choice.
pink-and-gold-vintage-candoliers
Blinged up Vintage Holiday Candoliers

Decorate Candoliers with Bling!

This is the fun part, and the sky’s the limit!  I have a big stash of everything, but my problem is, I have a hard time thinking up clever ways to repurpose things. Is anybody else in this boat??? I have old jewelry bits and bobs, LOTS of doilies, buttons, ribbon…you name it. And of course, I can’t bear to throw any of it away because Murphy’s Law says, “as soon as you do, you’ll need it.”

Before Carol, I promise I didn’t know how to do anything. Growing up, we never did crafts at our house.

From Carol, I learned how to make fabric flowers.

From Carol I learned how to decorate things with old buttons and jewelry

From Carol I learned how to make use of broken pieces of china

From Carol I learned how you could even use stained doilies in projects (GASP!)

In fact, I’m certain Carol and my Mama were related because neither one threw anything away!

So I blinged up these candoliers with my homemade DIY flowers, stashes of stained doilies, broken jewelry, strips of bridal bling, old broken hair barrettes, bits of ribbon and buttons, bits of bead trim, a velvet rose from a box of candy, and a few stick-on rhinestones and faux pearls I bought.

pink-candoliers-with-bling
Pink Candolier with Broken Hair Barrette

And the more I looked at my blinged up vintage holiday candoliers, the better I liked them! I was especially drawn to the ones I painted white. I decided to display them in front of an old oak piece we found last year at a yard sale for $20.

mantel-piece-without-embellishment
Antique Oak Mantel Piece

They looked good! Both hubby and I liked them, but something was missing.

Ah, the bulbs! Such masterpieces somehow deserved better than those old blah, boring nightlight bulbs. A search on Amazon and we found flickering candlelight bulbs. (Affiliate link below). We couldn’t wait for them to arrive and weren’t disappointed!

closeup-of-blinged-up-candoliers

These vintage candolier sets look amazing on the mantle now, so good that I even splurged on a faux magnolia leaf garland to cover up the electrical cords. I can’t tell you how pleased we are with the whole set-up.

In fact, almost everything on this mantle is a thrift store, yard or estate sale find. From the beautiful carved oak mantle piece ($20), to the candolier set ($2), to the lead crystal angel, right ($2.50), to the white bottle on the left…liquor bottle I painted white ($1). I’m so lovin’ it! And the faux magnolia garland in the background, I adore because it’s so real-looking. ($30 something-affiliate link below).

blinged-up-vintage-holiday-candoliers-in-front-of-old-mantel
Rescued Holiday Candoliers


So go find you some of these vintage candolier sets and bling it up girls!

I’ve included suggested supplies below for your crafting convenience! If you purchase, I do earn a small commission to help support this blog, but you won’t owe a penny more! Go here for my full disclosure policy.


Sharing with these link parties!

PLEASE PIN!pinterest-image-for-rescued-holiday-candoliers-get-a-fun-makeover

And now for more thrifty goodness!

Check out what my fellow upcyclers created below!

An InLinkz Link-up


—


Filed Under: Home and Garden DIY Tagged With: bling in DIY, bling up vintage window candles, repaint holiday candoliers, repurposed window candoliers, thrift store finds., thrift store upcycle, thrift store upcycle challenge, upcycled estate sale find, upcycled thrift store find, upcycled yard sale finds, vintage holiday candolier makeover, window candle makeover

DIY Valentine Heart Wreath

January 15, 2018 by Florence 67 Comments

Time for the first C’mon Get Crafty Blog Hop of the year, and I’m joining many other talented bloggers to show you a craft we create from our stash of supplies. Pink is my favorite color; Valentine’s Day is approaching; our weather has been dreary, and this little DIY Valentine Heart Wreath seriously makes me feel cheerier just looking at it.

craft-room-destash-challenge

Every month a group of bloggers are challenged by C’mon Get Crafty to create a new craft or project from their own stash of goodies! Check out some awesome creations you might be able to make from your own stash! #CraftRoomDestashChallenge

[clickToTweet tweet=”What crafty creations could you make today from YOUR craft stash?! #CraftRoomDestashChallenge” quote=”What crafty creations could you make today from YOUR craft stash?! #CraftRoomDestashChallenge”]

If you’d like to join in the Craft Room De-Stash Challenge, you can request to join our Facebook group here!

 Loading InLinkz ...

I created this beauty using everything I had on hand from the bit of cardboard, to the scrapbook paper, to the ribbon and buttons, I didn’t spend a dime. Per the rules, we are to not spend over $10 for needed supplies.

diy-valentine-heart-wreath


By the way, in case you couldn’t tell, my wreath is a girl. And she is modeled by “Flossie,” who took time out of her busy schedule modeling Square Dance clothes for my 2nd Etsy shop, SquareDanceNWestern.

She is wearing the fullest petticoat I own, and she really knows how to make those skirts swirl! And I’m talking stand-out-straight swirling. When a gal gets twirled by her guy on the Square Dance floor…? Well, she better be wearing those frilly pettipants. Don’t know what “pettipants” are? Ha! Don’t feel bad. I didn’t have the slightest idea what they were either. Think ruffled panties and you got it…just like baby girls wore over their diapers.

Oh excuse me, we’re talking about wreaths here. “Flossie” gets carried away talking about Square Dancing. She loves to cut a rug too.

Do you want to know how I made this? We’ll talk about it below.

valentine-heart-wreath

All I used was a circle of cardboard, various pieces of cardstock, paper ephemera, vintage buttons, ribbon, and old paper coasters.

The world is your oyster here. You can let your imagination run wild and create anything you want. I just fooled around and made something I liked. And Flossie likes it too. In fact…sh-h-h, don’t tell her yet, but I might give it to her for a job well done.

Start with a circle of cardboard like this.

cardboard-wreath-form

Honestly, I think your cardboard is the most important choice of the whole process. Pick a heavyweight scrap piece. This came from a box originally holding steel cookware. Flimsy cardboard will bend and your wreath won’t hang right. Take your time cutting it out too.

use-a-compass-to-draw-a-circle

Remember these compasses from 4th grade math? That’s what I used to draw a nice shaped circle because I didn’t have a large enough dinner plate to trace around.

Guess who couldn’t remember how to use a compass from 4th grade math?

Guess who never really understood how to use a compass from 4th grade math?

So I asked that man of mine. He may not know how to Square Dance very well, but he can sure work circles around me when it comes to math.

OK, back to the wreath.

Next, decide what kind of hanger you want to use. If you’re like me, sometimes these basics get you stumped, right? You sure don’t want to figure out a way to hang it after you have it decorated. This needs to come first.

Decide how you want it to hang, (ribbon or twine is best with cardboard). Then choose a color that complements your decorations.

I used pearl ribbon I had on hand. Wrap it around the cardboard. You can tie a bow at the top if you like.

Next I knew I wanted a border to go around the outside of the wreath. I didn’t have any small paper doilies on hand which would be cute, so I used these Christmas coasters I’ve never liked.

paper-coasters-used-as-a-border

You can see they have a scalloped edge and look decorative. I cut them in half, gluing them around the outside of the wreath. My only regret is that I still have some left!

paper-coasters-cut-in-half-to-use-as-a-decorative-border

Most of this border will be covered up, but I like the look!

wreath-with-desired-border

Now begins the fun part! I knew I wanted a heart wreath in pink colors, so I began cutting heart shapes out of my pretty scrapbook paper Mod Podging them on. I also cut hearts out of old magazine pages I found free last year at a yard sale. Just glue them on, overlapping as you go.

(Here are a few supplies for making your own wreaths. If you purchase, I make a small commission, but it doesn’t cost you a penny more. For more on my disclosure policy, see here.)

This is the part where you make it you! Use cut-outs of tractors and dump trucks…whatever you want.

begin-decorating-the-wreath

It’s done, and I believe “Flossie” is about ready to carry it down the aisle, don’t you?

finished-wreath

Don’t let me keep you. I’m off to ask if “Guy” popped the question yet….

PLEASE PIN! 

pinterest-image-for-diy-valentine-heart-wreath

Sharing with these link parties.…

Other Posts You Might Enjoy…Just click on the photos to be taken to the post.

fun valentine vignette with pincushions

Filed Under: Holiday/Seasonal Tagged With: c'mon get crafty blog hop, craft room destash, craft room destash challenge, diy valentine heart wreath, make a valentine wreath, make a valentine wreath with old coasters

When You Get Paid in Collards There’s No Money for Christmas

December 24, 2017 by Florence 37 Comments

On the cusp of Christmas Day, I thought I would share a magical Christmas memory, and explain “when you get paid in collards there’s no money for Christmas.” My dad was a doctor, but we were far from rich, as people automatically assumed. My dad was kind and big-hearted, and more often than not, took payment in the form of:

  • a bushel of collards,
  • a bushel of turnip greens,
  • a bushel of green beans,
  • a bushel of cabbages, and
  • the yuckiest-looking, stinky, fishy-smelling fish I’ve ever seen in my life.

Oh I’ve got some stories about those bushels, and especially that fish! Stories for another day.  Just remember, when you get paid in collards, there’s no money for Christmas, and not much else. I remember that year well…

  • when I was five
  • when I still believed in Santa Claus,
  • when I listened for reindeer hooves on the roof,
  • and woke to a huge pile of presents under the tree on Christmas morning, or at least, it seemed so.

Funny…that year Mama said she didn’t have any money, but in my memory, it was a most magical Christmas! Today I marvel over the precisely drawn knobs and cabinet doors on a simple cardboard box, which was the kitchen counter for the dollhouse I asked for. I ran across it recently when going through forgotten boxes under the bed, smiling at the memories.

If you look past stains, peeling paper, and browned, scotch tape edges, you can see the charm of the old “kitchen counter.”

dollhouse-kitchen-counter

As I recall, I asked for both a dollhouse and a drum.

And here is the dollhouse!

the-washstand-dollhouse

Opening the bottom doors of the old washstand, reveals the dollhouse. Entirely covered with “wallpaper,” it had “pictures” on the walls, and the doll bed in the corner.

old-dollhouse-revealed

The kitchen counter fit nicely on the opposite wall.

Wish you could see the blue princess doll bed she constructed out of a coathanger, part of a wooden box, a piece of foam, and bits of fabric and lace. It even had one of those halo canopy things with pearls and cascading fabric around the head of the bed. I can just picture her staying up late laboriously putting it together. I kept it for many years, until it finally fell apart. The kitchen counter and the “prince accessories” are all I have left.

You know a “Prince” has to be outfitted properly to woo his princess. He has to have a Prince’s tunic, (blue), and a special cardboard hat (hand sewn with blue thread).

the-princes-hat

And of course, he has to have his (cardboard) shield (decorated with rhinestone and heart-shaped thingy), and sword (made from a hatpin).

princes-sword-and-shield

She made the drum from a tall Quaker’s oatmeal container. In my mind I pictured….well, I don’t know what I pictured…but I remember being a bit disappointed by the homemade drum. I didn’t play with it much, but this tomboy played for years with the dollhouse and accessories!

My Grandmother usually spent Christmas with us, but rarely gave gifts. That year was the exception. She gave me 2 little reindeer she made.

Grandmother, who I’m named after, was OLD…utterly ancient.  She had little money, and lived in an old white farmhouse in Tuscaloosa, Alabama. She married my 40-something Grandfather when she was 16, and they had 9 children. My mother was the baby.

Funny about her name…”Grandmother.” My brother called her “Granny.” My cousin, Ray, called her “Granny.” Most of the other cousins called her “Granny.” As I was about to follow suit, Mother told me emphatically, “YOU are to call her “Grandmother.”

I still have those little reindeer from over 60 years ago that she made with pipe cleaners, bits of styrofoam and sequins.

old-styrofoam-reindeer-that-grandmother-made


styrofoam-reindeer-2-that-grandmother-made

Where she got all those things I can’t imagine. This was waay before Michael’s, Hobby Lobby, or Joann’s Fabrics even existed. I can just picture her scrounging through a meager stash to find the right supplies with which to make these engaging little fellas. At the time I wasn’t impressed, and couldn’t understand why Mother gushed over them so. KIDS! I was so clueless and ungrateful. I didn’t appreciate Grandmother’s efforts with arthritic hands until it was far too late to tell her so. By some miracle, the little reindeer survived many moves and purges. They are oh-so-precious to me now.

The only thing we ever gave her for Christmas was…not scented bath powder, not perfume, and not a knick-knack, but a big paper sack full of groceries, and I remember thinking, “GROCERIES??” But Mama said she was giving what Grandmother would never buy for herself. The sack was overflowing with boring things like post cards and stamps, lots of canned food, a great big jar of spiced peaches, and always a box of chocolate covered cherries. I like to think I inherited this from her because it’s my favorite food treat at Christmas too.

So as we’re about to enjoy another Christmas, I’ll be thankful for what I have, for the precious family who remain because nothing is ever a given.

And I’ll be ever so grateful for the unspeakable gift of God’s Son.

christmas-creche-in-a-vase

Wishing you a very merry Christmas!

Sharing with these link parties….

Filed Under: Holiday/Seasonal Tagged With: a magical christmas, child's christmas, christmas memory, homemade christmas, magical christmas memory, no money at christmas

How I Repurposed a Toy Red Ladder in my Christmas Decor

December 18, 2017 by Florence 30 Comments

Here’s a project I’ve been thinking over for a few weeks…How I Repurposed a Toy Red Ladder in my Christmas Decor.

Just a bit of background~

I found it in a hazardous basement in an old house estate sale. Now why was it hazardous? It was a glorified crawl space really. And you know what a crawl space is like, right? Uneven floor, dirty, nowhere to hold onto. Husband hovering with his hands held out…don’t fall, don’t fall! For someone like me who CAREFULLY watches every step, I learned the hard way I can’t be careless. Because I fell 3 times last year, breaking 3 bones, and basically spent 8 months in a chair. So I’ve learned to be careful.

But the basement was a treasure trove! A treasure trove of grimy, dusty sacks piled one on top of the other, thrown to the furthest corners of the crawl space…a place you go if you’ve got good knees, are willing to crawl, and get very dirty. Someone who’s young….Ha! Not me! I had to “settle” for stepping blindly in the closer part of the dirty basement. And this is where I found the red ladder among many other interesting items which you can see in this post. 

I really wasn’t sure what to do with it. I started to leave it there. I have to tell you my mind doesn’t revolve around DIY projects much. My mind revolves around whether I’m likely to sell it in my Etsy shop or not. I have no idea what it goes with…surely not a game? It’s definitely not meant to bear any weight, so what was it for?

the-naked-red-ladder

If you know, please leave a comment.

How to Repurpose a Toy Red Ladder for Christmas

But as Christmas rolled around, I thought perhaps I could make an arrangement with it. But craftiness never oozes out of me…LOL. I thought about a front door arrangement, but it’s too long to hang any other way but vertically, so this is what I came up with, and I kinda like it.

Hung in our entry, it’s visible as you come through the front door. Using several finds from the grimy estate sale, and an old faux garland…Our “Wes” is checking out the softer garland I didn’t use.

choice-of-faux-garlands

Here is my original DIY creation for the “C’mon Get Crafty Blog Hop.” Keep reading to see how I made it. And be sure to check out the projects of the other crafty bloggers!

red-ladder-christmas-arrangement

 Every month a group of bloggers are challenged by C’mon Get Crafty to create a new craft or project from their own stash of goodies! Check out some awesome creations you might be able to make from your own stash! #CraftRoomDestashChallenge
craft-room-destash-challenge

[clickToTweet tweet=”What crafty creations could you make today from YOUR craft stash?! #CraftRoomDestashChallenge” quote=”What crafty creations could you make today from YOUR craft stash?! #CraftRoomDestashChallenge”]

If you’d like to join in the Craft Room De-Stash Challenge, you can request to join our Facebook group here!

An InLinkz Link-up


Starting off with these supplies, my inspiration came from the objects at the end of the arrows.

red-ladder-arrangement-supplies

Red arrow: old plastic prisms came in a box of lamp parts I acquired back in the summer, and they hadn’t sold. I tried Mod Podge with white glitter on 3 of them, but the Mod Podge left a cloudiness I didn’t like.

Blue Arrow: I found 2 sacks of colorful pinwheel beads at the grimy estate sale and have already used  them in 2 projects.

Not everything in the photo was used.

The Process of Decorating the Ladder~

  • I wound the faux garland in and out some of the rungs and around the back. It was much too long for the ladder, but I didn’t want to cut it in case I could use it for something else next year.  
  • Next the battery-operated string of LED lights 
  • Using fishing line, I strung it through the little holes in the vintage prisms,
  • followed by 8 pinwheel beads,
  • then either a clear acrylic icicle ornament or a gold icicle ornament.
  • Eight beads separated each ornament. How did I come up with 8? I don’t know…a lucky guess because the icicle garland was exactly the right length for the ladder.
  • When I was ready to put the icicle garland onto the faux greenery, I used ordinary wire ornament hangers to fix the icicles and prisms on the branches while arranging the beaded garland where it would stay.
  • I added a few colorful ornaments for extra pizzazz, and there you have it!

I would love it if you’d pin! Thank you!

pinterest-image-for-red-ladder-diy-repurpose-christmas-project

Now all we need is a Christmas tree! I’ll have to tell you that story soon!

Sharing with these link parties….

If you click on and purchase one of these items, I will receive some small compensation, but at no additional cost to you! Thanks for helping to support this blog!


Filed Under: Holiday/Seasonal Tagged With: christmas arrangement with a red ladder, christmas garland on a ladder, diy ladder christmas arrangement, diy ladder repurpose, toy ladder christmas door decoration, toy red ladder christmas arrangement

  • « Previous Page
  • 1
  • 2
  • 3
  • 4
  • …
  • 9
  • Next Page »

I’ve Been Featured…

ive-been-featured-link-party-buttons
oh-my-heartsie-girl-wonderful-wednesday-button
snickerdoodle-button

Beezer…Over the Rainbow Bridge 2017

Vintage Southern Picks on Etsy

Vintage Southern Picks on Etsy

Everything Square Dance & Western on Etsy

Everything Square Dance & Western on Etsy

© 2017 Vintage Southern Picks | All Rights Reserved

Disclosure: Some of the links on this website may be affiliate links. When you make a purchase from these links, I earn a small commission.