
While I love shabby chic and admire upcycled lampshades dripping with pearls, studded with tattered fabric roses, and covered in doilies and lace, I know it won’t fly with hubby. (Just check Pinterest for lacy lampshades of all types.) In doing the next needed restoration, I wanted to try out a doily lampshade makeover – husband-approved. I certainly had no inclination to buy a new shade.
I also love lampshades stripped of all fabric, decorated around the edges and ribs with bits and bobs, but let’s face it, they’re impractical for real home use.
I’m the kind of gal that has a little of the romantic frou-frou gene, a little of the minimalist gene, a little of the rustic primitive gene, and a lot of the traditionalist gene. And I’m married to a guy who thrives on tradition…not an ounce of frou-frou lives in his body.
Enter the tattered lampshade…..how to get “the look” without looking like you’re getting the look?

If you remember, the last lampshade got a makeover using men’s ties….
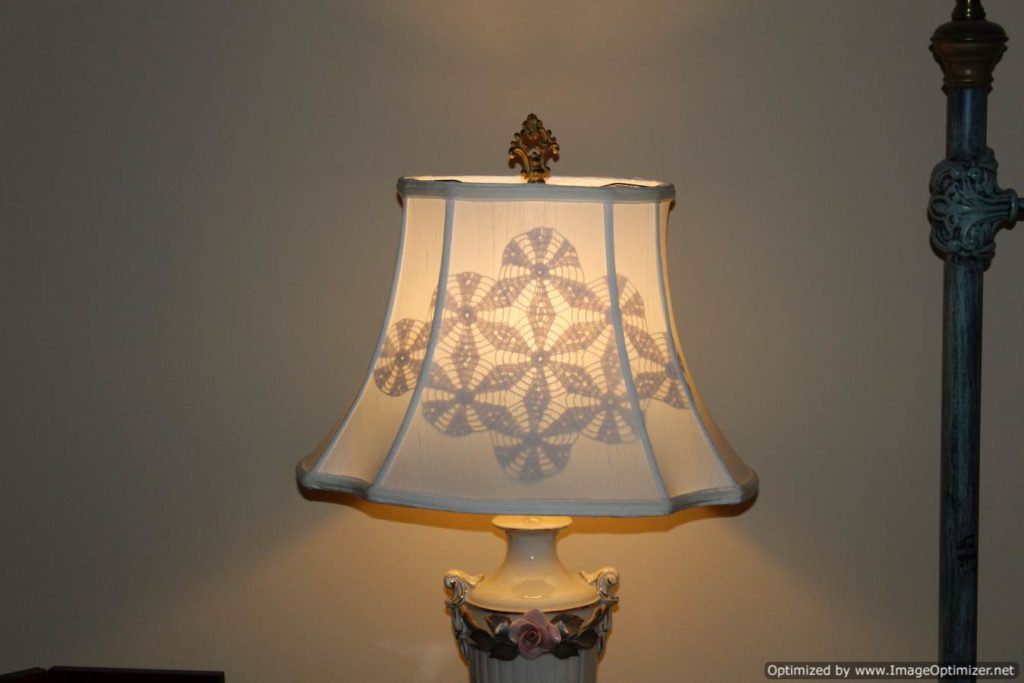
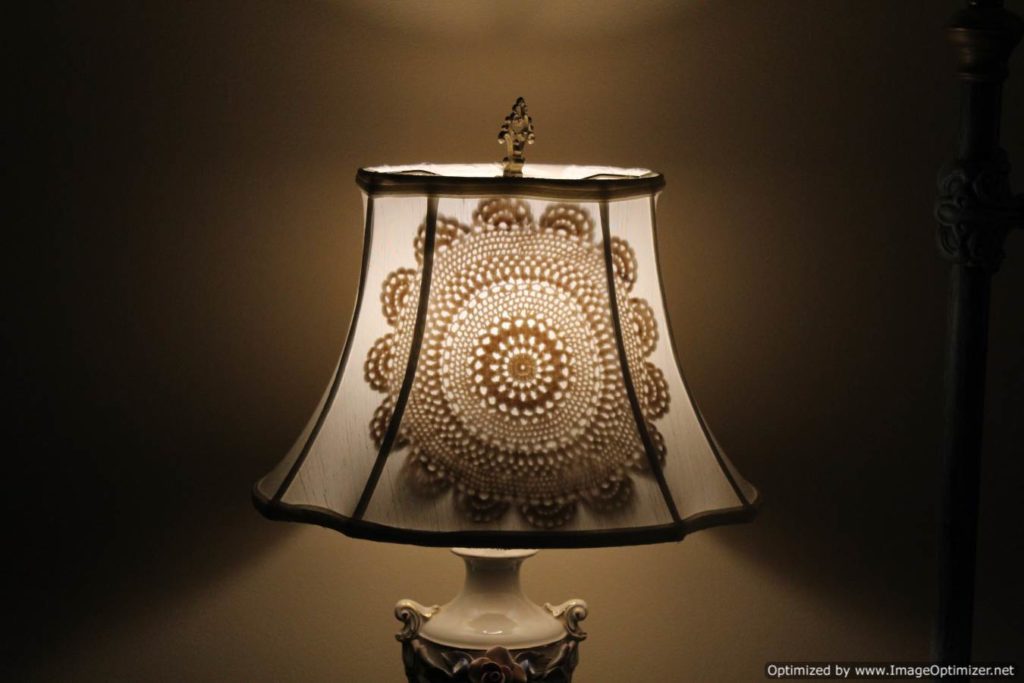
Because this is going in our bedroom, where hubby and I will see it every night, I thought, “why not place doilies on the inside of the shade?” Would this work?
The Doily Lampshade Makeover
As you can see in the photo, only half the inner lining is shredded. I decided to tear the rest of it off for a more uniform look.
Selecting only 2 doilies out of my stash, I centered the doily on the inside of the shade right over the ribs, which are now exposed.
One of the doilies even had a minor stain, but doesn’t show.
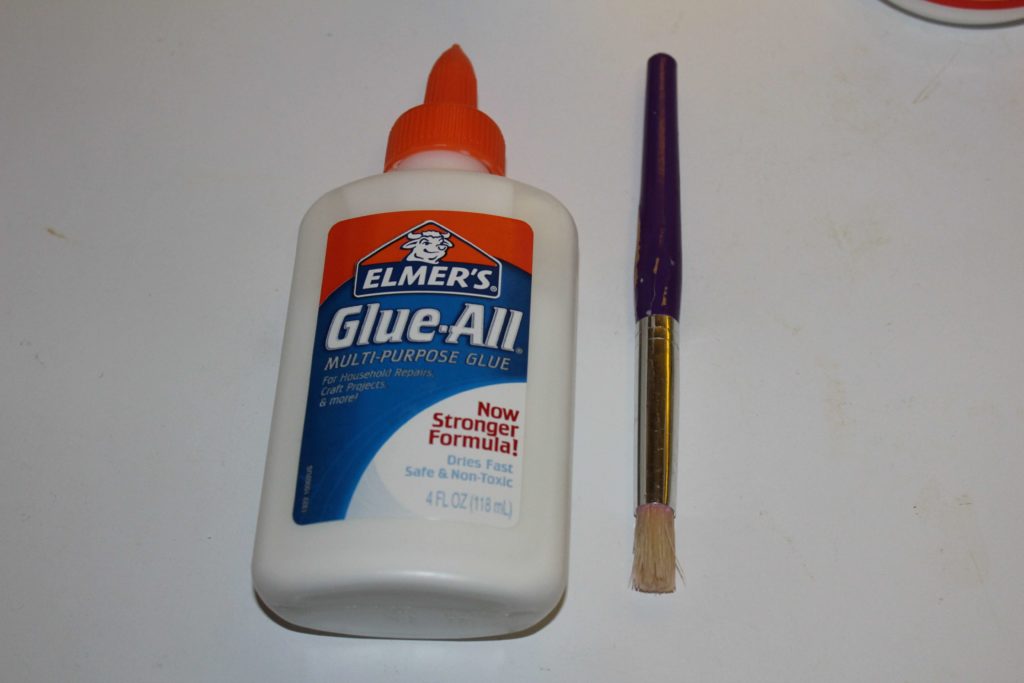
Next I glued them on, using regular Elmer’s glue.
Dab the glue onto the most solid areas of the doily, then press onto shade.
I did not put the glue directly on the shade, and so far, it is adhering well.
Here is the final effect. I love it! Looking like a regular lampshade on the outside (when the lamp is off), it will satisfy the most non-frou-frou of hubbies, but delight the most shabby chic-loving, romantic, girly girls. It’s neutral and I don’t have to worry about colors clashing.


I decided to use only two, but you could use as many doilies as you want.
This is a quick 30-minute project, depending entirely on how big your lampshade is and how many doilies you want to use.
Please Pin or share!
Florence
Latest posts by Florence (see all)
- The Latest Vintage Hauls - February 10, 2020
- A Vintage Fall Haul - November 3, 2019
- September Sales on Etsy and My New Antique Booth - September 30, 2019
- Camping Trip Thrift Store Haul - August 2, 2019
Very attractive! Will the glue hold up to heat? I might want to try this too 🙂
So far it is holding up! Nothing has fallen off yet!
That looks great Florence! I would have never thought to put the doily on the inside!!
Tania
I love how it looks Tania! It makes me smile.
Such a unique look! I love it!
Thanks Tavin! So glad you stopped by!
This looks fantastic. It has just the right amount of frou-frou. It is a perfect look.
Thanks Debra! I loved it the first time I saw it.
Florence this is a beautiful makeover and I can see why your husband approves of it. It is subtle frou-frou without being in your face. It looks lovely and adds interest in a subtle way and is a great way to repurpose those doilies. It has my stamp of approval too!
Thank you Mary!
Love it Florence! It’s very pretty. Pinning!
Thank you Tuula! Thanks for pinning!
Quite the charmer! Pinning and sharing.
Thank you Donna. So appreciative!
What a totally charming idea!!
Thanks Kim!!
Florence, this is beautiful!! What a great idea to add the doilies to the inside, very clever!
Thanks Keri! I love it!
So very clever and BEAUTIFUL…love it. Thanks for sharing with us at Waste not Wednesday and I hope we see you again this Wednesday!
Thank you Denise!
So lovely!! Great upcycle!!
Thank you Kelly!
That looks lovely and I can see why you husband approves, it’s subtle and elegant. I have a bag of doilies made by my grands that I need to find something to do with, this is definitely an option 🙂
Thank you Toni! Appreciate you stopping by.
OH WOW I love this, I have so many doily and old lamps I could do this. Thanks for the inspiration. My mom had so doilies she gave me and they have so much memories to them.
Maria
Thank you Maria! I know what you mean…most of the doilies I have were handmade by my Grandmother. Thanks for dropping in!
It turned out good, Florence!
Really pretty! A couple of years ago I did something similar. If you’d like to see it, I think the post is from 2015… I’ll go look it up. I took a bunch of doilies I’ve had for years and years, some from my trip to England in 2005, and lightly hot-glued them onto a shade. Turned out quite well, I thought.
Here’s the link: http://www.frenchethereal.net/2014/09/super-cute-lampshade.html.
Enjoy your “new” lampshade!!!
Barb 🙂
Thank you Barbara! Glad you liked it! I would love to see your lampshade project!
Florence, your lamp is so pretty. I love that you used vintage linens to redo the lamp shade. Thank you for sharing at the Snickerdoodle Create~Bake~Make link party!
Love it, Florence–it’s just as you describe–pleasing to both the masculine and feminine side in all of us 🙂 Thanks for linking it up with us at Vintage Charm–
A subtle bit of lace that adds just a bit of texture. Very nice!
Thanks Cathy! Glad you like it! Thanks for dropping in too.
Oh my Florence, what a beautiful impact that lampshade makes when the light is on. It’s the perfect win/win for you and hubby. Stunning
Thank you Michelle!! Appreciate your kind words!
I absolutely love this Florence! It has a real romantic look to it.
Thank you Pam!!
I LOVE this idea, Florence; and it would fantastic! You did great.
Thank you Carol! It was so easy too.
It is so pretty. Can you see the glue at all thru the shade?
Hi Ronny! Thanks! No you can’t see the glue.
I’m sure the doily casts a lovely pattern. Very creative makeover.
Thank you Lisa!
It is really a beautiful look!
Thanks Carol! I appreciate your comment!