• Home
  • About
    • About Me
    • Contact Me
  • Etsy Shop
  • Link Parties/Featured
    • I’ve Been Featured
    • Sweet Inspiration Link Party
  • Personal Diary

Vintage Southern Picks

Cheapskate Picker Sharing Finds, DIY & Selling Tips

Facebook   Twitter   Pinterest   Google+   RSS
  • DIY Projects
    • DIYs to Sell
    • Holiday/Seasonal
    • Home and Garden DIY
  • Home and Garden
    • Home Organization
    • How I Organize My Ebay/Etsy Home Office
    • Home Tours
    • Party Games
  • Selling Tips
    • Buys I Avoid
    • Shipping
    • What’s Selling on Etsy/Ebay
    • Yard Sales
      • How to Give a Yard Sale
      • What Not to Say in Yard Sale Ads
      • Yard Sale Humor
  • Vintage Finds
    • Thrift Store Finds
    • Mystery Items
    • Yard/Estate Sale Finds
    • Vintage Junk Giveaways
  • Disclosure Policy
  • Privacy Policy

Blah to Chic Easy Hack for a Vintage Swing Frame

April 25, 2016 by Florence 8 Comments

Blah to chic easy hack for a vintage swing frame
Vintage Swing Frame Makeover

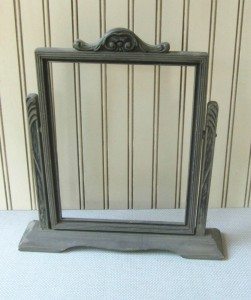
Gear up for a Blah to Chic Easy Hack for a Vintage Swing Frame! I see vintage swing frames all the time at estate sales. They are usually just the frame with no glass, and mostly all painted gray. Here is one I tried to sell just as pictured at below left on Etsy. But after 4 months, no takers.

Nothing wrong with the frame, and I didn’t know if the problem was no glass, a less than perfect photo, a dull paint job, or what. Personally, I like the old finishes if they are in nice shape, but my rule is a makeover if no interest in 4 months. So I decided to paint it. I was so glad I did, because that became my blah to chic easy hack for a vintage swing frame makeover! (right) The white really makes it pop…I like it!

blah to chic easy hack for vintage swing frame
Swing Frame Before
blah to chic easy hack for vintage swing frame
After Photo: Painted Vintage Swing Frame

I used chalk paint in “Old White,” which I had on hand, and you know the beauty of chalk paint is no preparation, such as sanding or priming….just slap it on there. After that dried, I used a brown glaze I had on hand to bring out the carved details.

The point of this project was to create something in the frame to decorate it without using glass. Being my Cheapskate self, I didn’t want to go out and buy glass!

The inner mat is a piece of plain cardboard cut snugly enough to fit the frame without falling out, and then painted with “Old White.”

I had already seen and admired this on Pinterest, which I sought to emulate. I like the way Viola at http://shabbychicinspired.blogspot.com surrounded her photo with bits of laces and trims to create this lovely piece.

blah to chic easy hack for a vintage swing frame
Fabric Collage

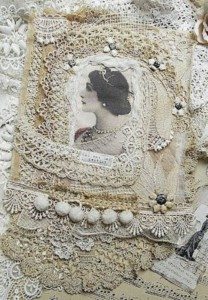
The first thing I did was look on graphicsfairy for a vintage photo of a girl or woman that appealed to me. FYI…Graphics Fairy carries all kinds of vintage photos available in free downloads!  http://thegraphicsfairy.com/

 You could also use a vintage cabinet card as the main photo.
Next I dug in my huge vintage lace and crochet stash for bits I could use for embellishments…then a few buttons from my vintage buttons stash. Lace was applied with Mod Podge; buttons with hot glue. All applied on top of the painted piece of cardboard (and I was so glad I painted that…I started not to).


Tada! The finished result!

blah to chic easy hack for a vintage swing frame
Swing Frame Completed

I’m very pleased with how it turned out! This is designed so that the buyer may easily pop out the mat and use the frame for their needs. This was an easy and quick project, so the next time you see a swing frame, grab it!

Do you like it? Thoughts? Please leave a comment!


Filed Under: DIY Projects, DIYs to Sell Tagged With: chalk paint, decorate, diy frame, easy project, embellish, hack, lace, old buttons, old white, quick project, repaint, repurpose, swing frame, upcycle, vintage, vintage frame

Picture Frame Transformations

April 7, 2016 by Florence 4 Comments

The first of several picture frame transformations. These metal frames are quite lovely when presented right. This is NOT the way to present one! I’m embarrassed to admit I actually had this for sale in my Etsy shop, and in my booth before that…well, I was just TRYING it like this for awhile, okay? I have learned that frames sell better when they have something in them. So I was desperate, and I picked out the only thing I could find at the moment.

Picture Frame transformations
Vintage Picture Frame with hideous print
Picture Frame Transformations
Norman Rockwell “Buggy Ride” print

Sorry Norman Rockwell, but what’s wrong with this picture? The scale is off for the frame. “Saturday Evening Post” is cut off. The buggy whip makes the glass appear to have a crack. And the girl looks like warmed over death. So we don’t have to wonder why this didn’t sell!


So THAT became this!

Picture Frame Transformations
Metal Picture Frame Transformation

The first thing I did was paint the frame, which made a huge difference in its appearance. Then I printed off the hydrangea from the Graphics Fairy website http://thegraphicsfairy.com/…a wonderful go-to for lovely FREE vintage photos of all kinds.

Nice, but it still needed something. Ah! A mat, and my vision was a gingham check, cloth-covered mat of some kind, and I just happened to have that fabric on hand, but how to make a mat? “Cheapskate” does not go somewhere to buy a mat! Enter PINTEREST! Then I found a DIY project on how to make picture frame mats out of cereal boxes! See that tutorial here.

But I have a confession to make…this project looked easy, but was difficult for me, which might have something to do with the fact that I’ve never been too good with taking accurate ruler measurements. I must have been absent the day they taught that in grammar school! And I had a hard time with making the fabric go neatly around the corners.

Amy @https://www.pinterest.com/source/amyjdelightful.blogspot.com.au does recommend the use of mat board. But you can substitute cereal boxes, which is what I used. I finally threw up my hands in frustration and gave it to the hubby who can fix anything. Did I mention I’m not too crafty???

It’s a lovely project and I’m sure you will do just fine with it. The great thing about this project is that it’s a quick fix, attractive, and you can complete it with what you have on hand. It really adds a nice extra touch that will help sell the item. I was VERY HAPPY with how it turned out!

And the picture frame transformation did the trick. SOLD!

An improvement, yes? Tell me what you think!


Filed Under: DIY Projects, DIYs to Sell Tagged With: graphics fairy, hideous, makeover, norman rockwell, painting, picture frame, picture mat, pinterest

DIY Vintage Suitcase

March 30, 2016 by Florence 6 Comments

DIY Vintage Suitcase Project: I love vintage suitcases! They are perennially popular and always sell. Some take more time than others. Case in point (no pun intended!)

One blue suitcase. UGLY inside, so I stripped it down to the bare bones. I tried selling it cheap so someone could do their own repurpose job from those tantalizing projects seen on Pinterest. But after 4 months on Etsy…no takers. So it sat around for a couple more months while I decided what I wanted to do with it.

vintage suitcase
Vintage Blue Suitcase
inside the vintage suitcase
Inside the Vintage Suitcase


Wanting to do this project by spending as little money as possible, I dug out old paper songbooks I had bought in a box full for $1.00 a while back, so I tore out pages at random to paper the inside.

DIY Vintage Suitcase
Old Songbooks


Tools I used: scissors, Mod Podge, and Walnut Ink. Simple. But working with decoupage is very messy, so it is important to prepare your area. Just a few spritzes of Walnut Ink, and you have the instant age look! Or you could also use coffee or tea to age your papers.

DIY Vintage Suitcase
Walnut Ink


Everything is now glued in. I’m not crazy about it, especially not the big blotchy “Blue Danube”on the lid, and the other small blotchies. And it’s too white looking…enter Walnut ink. I’ll fix the blotchy look by gluing more paper down over it.

DIY vintage suitcase
Suitcase too white looking

Ah…ha! This is much better! Less blotchy, and a little aging with the ink brings this result. I’m kinda liking it. So we’ll see if it sells……………………………………..

Would you believe this sold within 24 hours of listing it???

SUCCESS!!

Next time I do a DIY vintage suitcase, think I’m gonna try the torn paper look, but I’m very pleased!

DIY Vintage Suitcase
Final Look

What do you think? Please leave a comment!

Filed Under: DIY Projects, DIYs to Sell Tagged With: aging, bare bones, mod podge, old songbooks, papering, redoing, relining, repurpose, sheet music, suitcase, upcycle, vintage, walnut ink

  • « Previous Page
  • 1
  • …
  • 7
  • 8
  • 9

I’ve Been Featured…

ive-been-featured-link-party-buttons
oh-my-heartsie-girl-wonderful-wednesday-button
snickerdoodle-button

Beezer…Over the Rainbow Bridge 2017

Vintage Southern Picks on Etsy

Vintage Southern Picks on Etsy

Everything Square Dance & Western on Etsy

Everything Square Dance & Western on Etsy

© 2017 Vintage Southern Picks | All Rights Reserved

Disclosure: Some of the links on this website may be affiliate links. When you make a purchase from these links, I earn a small commission.