• Home
  • About
    • About Me
    • Contact Me
  • Etsy Shop
  • Link Parties/Featured
    • I’ve Been Featured
    • Sweet Inspiration Link Party
  • Personal Diary

Vintage Southern Picks

Cheapskate Picker Sharing Finds, DIY & Selling Tips

Facebook   Twitter   Pinterest   Google+   RSS
  • DIY Projects
    • DIYs to Sell
    • Holiday/Seasonal
    • Home and Garden DIY
  • Home and Garden
    • Home Organization
    • How I Organize My Ebay/Etsy Home Office
    • Home Tours
    • Party Games
  • Selling Tips
    • Buys I Avoid
    • Shipping
    • What’s Selling on Etsy/Ebay
    • Yard Sales
      • How to Give a Yard Sale
      • What Not to Say in Yard Sale Ads
      • Yard Sale Humor
  • Vintage Finds
    • Thrift Store Finds
    • Mystery Items
    • Yard/Estate Sale Finds
    • Vintage Junk Giveaways
  • Disclosure Policy
  • Privacy Policy

Make Your Own Awesome Napkin Designs for Napkin Decoupage

May 6, 2018 by Florence 44 Comments

Life Got in the Way, and Here’s My Excuse…

I wanted to say a big welcome to all my new subscribers!! I normally post once a week, but I couldn’t get it together last week. Too much going on with us deciding to seriously downsize our house, and do all those home repairs you sort of live with for years, but don’t see anymore…you know the ones I mean! Then thinking about what we need to get rid of in an estate sale for moving in the near future.

Add to that minor surgery, looking for a new set of wheels, getting a speeding ticket (oops), scheduling a 4-hour driving school, and then being called for jury duty too (and I haven’t even been yet)…well, you can see why I didn’t have time to finish my post last week. Excuses, excuses…

I spend too much time sitting around thinking about what I need to do, but not actually doing it. Tell me I’m not the only one! That’s life. On to the post!

The Project

I’ve been working here and there on this project over the last several weeks. I found an old drum table at an estate sale a couple of years ago, and finally decided how I wanted to finish it. You’ll see that in another post.

In this post, I’m discussing how I finished the top with decoupage. I discovered how to Make Your Own Awesome Napkin Designs for Napkin Decoupage! As this is my 4th project, it’s a good bet to say I love it! Glass candle holders, old toolbox/jewelry chest that was a super DIY headache, and Jewelry Box Makeover have all been my guinea pigs as I learn the craft.

I’ve found pretty napkins at yard sales, estate sales, Etsy, and Amazon, and I like all of them. But when I want a change, or a new design, I can’t find what I’m looking for.

This is where my idea was born…why not create my own design by printing on a napkin?

I’ll tell you how I did it.

The table is going in front of these curtains, so the design had to complement the curtains. (And let’s hope it goes with the curtains in whatever garden home is in our future.)

curtains for color matching

Where to Find Images to Decoupage

Next I scoured The Graphics Fairy and Pinterest for vintage images I liked that had those colors.

I settled on these. Shabby Chic style is my game. I LOVE it! It’s not the farmhouse look that’s insanely popular, but lest you think Shabby Chic is dead, just take a tour on Pinterest. You’ll see it’s not.

vintage images to choose from for napkin decoupage project

How to Get the Design onto the Table was the Next Decision

Image transfers were out. For this project, I really wanted to do a collage, and didn’t want the table to come in contact with the amount of water necessary to complete an image transfer project.

I didn’t want to use traditional decoupage using layers of printer paper, so I leaned towards napkins, which are super thin.

An Idea was Born

Wonder if it would work to print my chosen image on the layers of napkin I peel off, I mused. If you’ve never done napkin decoupage, most decorative napkins are standard 3-ply, so in DIY projects, you’re using the top pretty layer. I’m using the 2 back layers I peeled off, saving them from the trash can.

2 ply paper napkin backing is what I used in this project

Experiment with Other Types of Paper Besides Napkins

First I experimented using white packing paper that came in an Amazon shipment. It gave my image a nice crinkly effect, but that paper was thicker than regular printer paper…not what I wanted.

On to the napkin idea! I peeled off the back 2 layers, placing one thickness on top of a piece of printer paper. To keep it aligned, I taped the borders down with scotch tape, then cut off the excess.

how to proceed with printing on napkin ply

What to Consider Before Running a Napkin Through Your Printer

I doubt it would work to run a thin layer of napkin through a printer by itself. A 1-ply napkin layer is much too fragile and I didn’t want to chance it. I secured the napkin to a piece of printer paper first, but I wasn’t sure it would work.

I thought about using adhesive spray to adhere the napkin to the paper, but I was afraid I would have trouble getting the napkin to come off in one piece.

Do the pieces of tape interfere with the design? For me it didn’t. I either tore around them or let them stay. It will totally depend on your design and what you want to accomplish. It will hardly be noticed after applying the final sealing Mod Podge layer to the top.

Fingers crossed, I ran the job. Success! The design came out almost perfectly! It was a little wrinkly, but I ironed it (no steam setting). Ironing isn’t necessary, but I prefer it because it helps to smooth out the paper.

image on napkin vs packing paper
Comparing the image printed on the napkin vs printed on packing paper


My first piece had a distortion at the top, but I’m leaving it. If it bothers me later on, I can always cover it with another piece of napkin. That’s one of the great things about decoupage. Make a mistake…just cover it up, and napkin layers are so thin, it’s not a problem!

Showing the distortion on my first image

Here’s the next image printed on the other napkin ply…Perfect!

attempt 2 is perfect

The Procedure

I used these napkins because they complement the curtains and I have a lot of them.

napkins for decoupage

When choosing pieces of the design to use, here’s an easy way to cut it out so all the edges look nicely feathered allowing them to blend into the design.

Go around the piece with a wet brush or Q-Tip.

wet edges of napkin

Gently tear along the wet line, which makes them look uneven…the look I was going for.

how to tear the napkin to get the feathered look

The drum table is hexagonal (6-sided), so I spaced out pieces of the napkins evenly around it.

placing the napkin pieces onto the table

I cut out pieces of the hydrangea blossoms to go in between.

The piece in the center is one sheet of French script, torn in half to be seen around what’s placed on top.

Hydrangea blooms spaced out on the table and one sheet of French script for the background

More Decoupage Gluing Tips

To avoid tearing the napkin when gluing, never slide your finger across it. Instead “pounce” your finger on top. That helps flatten napkin nubbies too. Nubbies are the little bumps on the edges of napkins.

pounce on top of image

When working with larger pieces, like the French script, place a sheet of Saran wrap on top and gently scrape across it with a credit card. This helps remove air bubbles while smoothing it out.

smoothing out a larger piece using saran wrap and a credit card

I accidentally discovered an extra sheet of script on top helped eliminate a developing problem.

another sheet of script on top

Because of the sheerness of the 1-ply napkin, I feared the final picture for the top would look funny placed on top of that whitish center, but this sheet of yellowish script helps fill in while adding to the look of the final image!

Here’s the final voila! I’m absolutely thrilled with how it turned out!

Finished napkin decoupage on top of drum table

It’s not perfect, but I love it. After all the hoopla of getting it to match the curtains, I rearranged furniture and moved it, ha ha. What do you think? Would you attempt to make your own designs?

FYI…I used the backing layers of 4 dinner size napkins for this project.

Sharing with these link parties….

If you’re panting for more Napkin Decoupage Projects…

featured image for decoupage napkin glass candle holders


Filed Under: Home and Garden DIY Tagged With: getting the feathered look in napkin decoupage, how to do napkin decoupage, making your own designs for napkin decoupage, napkin decoupage procedure, napkin decoupage tips, new technique for napkin decoupage, using vintage images for napkin decoupage

Update a Brassy Desk Lamp with Paint and Scrapbook Paper

February 19, 2018 by Florence 52 Comments

Last weekend we rearranged a little furniture. Took pieces to the attic I was tired of, and brought new ones down. I wanted a desk in the Great Room where we spend most of our time, so we man-handled down a little handmade desk my aunt gave me years ago. In the process, I found this cute little desk lamp in the attic I had forgotten about.

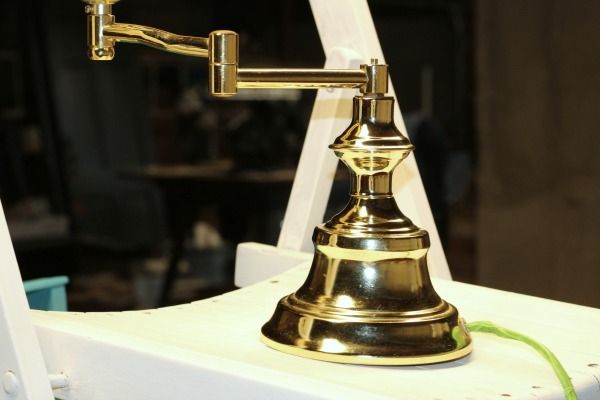
The only thing is, it’s a bit overly shiny brassy, and the lampshade is boring, but the lamp is just the right size for the space.

brassy-lamp-needing-a-makeover

Since C’mon Get Crafty, or “Craft Room Destash,” as it was formerly called, was coming up, I thought about updating the brassy lamp with a bit of paint and scrapbook paper as my project for the month.

I have loads of scrapbook paper, napkins, old magazine pages I picked up free at a garage sale…lots of things with which to update the lamp, and give it a bit of shabby chic love.

craft-room-destash-challenge

Before we get on with the project, here’s a little info about C’mon Get Crafty.

Every month a group of bloggers are challenged by C’mon Get Crafty to create a new craft or project from their own stash of goodies! Check out some awesome creations you might be able to make from your own stash! #CraftRoomDestashChallenge

[clickToTweet tweet=”What crafty creations could you make today from YOUR craft stash?! #CraftRoomDestashChallenge” quote=”What crafty creations could you make today from YOUR craft stash?! #CraftRoomDestashChallenge”]

If you’d like to join in the Craft Room De-Stash Challenge, you can request to join our Facebook group here!

How to Update a Brassy Desk Lamp with Paint and Scrapbook Paper

Painting the Lamp:

  1. Don the paint clothes
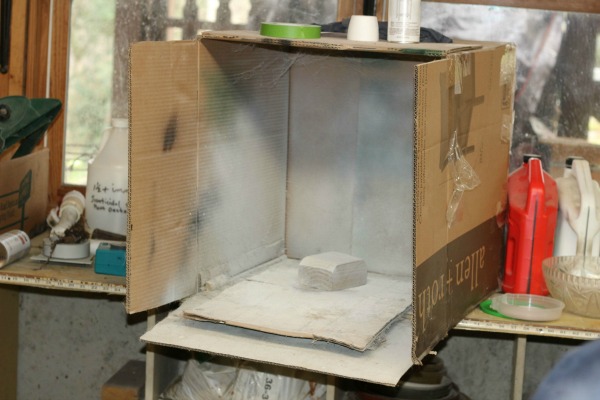
  2. Set up the high end paint station

    high-end-paint-station
    High End Paint Station
  3. Use masking tape or Frog Tape to protect the parts of the lamp you don’t want painted
  4. Spray paint the lamp with primer first (I used Zinsser Primer). It dries very fast. I applied 2 coats.
  5. Follow with your main paint color. I used 2 coats Krylon Classic White Chalky Finish paint.

Updating the Lampshade

The lampshade was pretty ho-hum to begin with, and the pleats quite brittle from being exposed to years of attic heat. Trust me, the photo is much too flattering!

lampshade-before
Lampshade Before

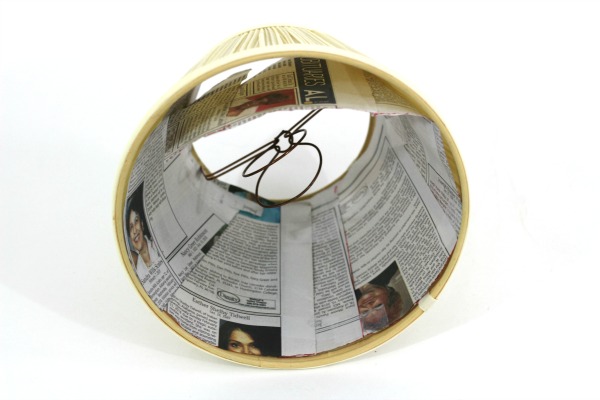
The most time-consuming part of the project was making a template for the inside of the shade.

template-fitted-to-inside-of-shade

I did that by piecing together strips of newspaper around the inside of the shade to get the correct dimensions. Here’s the finished template.

a-look-at-the-paper-template-for-the-lampshade

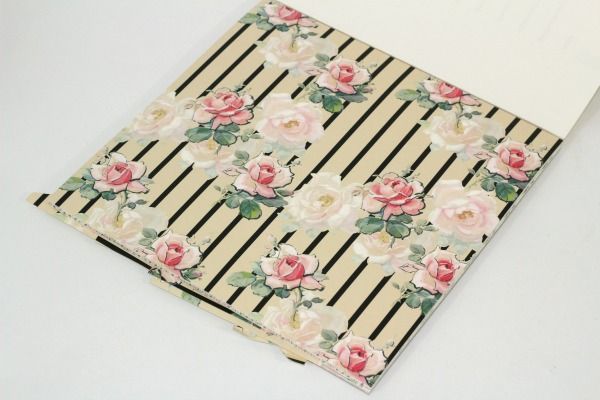
I found scrapbook paper I liked when I was fooling around one night trying to get a new look for the shade.

scrapbook-paper-i-loved

I was worried that stiff scrapbook paper wouldn’t adhere well to the inside of the shade, but it did.

It helped that there was a smooth plastic inner lining rather than lampshade fabric, which would not have worked.

Simply place your newspaper template on top of the scrapbook paper and trace around it, BUT…

TIP #1: Make sure that your design is right side up. (ask me how I know this.)

TIP #2: Make sure you’re tracing around the correct side of the paper.

TIP #3: The process is easier if you choose paper with a uniform design. 

Due to the square size of the scrapbook paper, the final lampshade liner was in 2 pieces, making it harder to match the design..

Once you have your 2 pieces and know where to line them up inside the shade, you’re ready for Mod Podge.

You need to work quickly, mod-podging the design side of the paper to the inner shade lining, which also should be mod-podged for good adherence.

Fit your new shade lining into the shade (and pray)!

As I told my husband, when I do a project, I want to do it perfectly. Ha! And this isn’t perfect. But it turned out a huge improvement over what was! The outside pleated shade gives a muted look to the paper and I really love it near my curtains.

finished-lamp

If needed, there are ways to disguise lampshade mistakes such as gluing on buttons, ribbons, or doilies so that they look intentional. I may glue some trim over the top and bottom rims of the shade for a bit of extra bling, but for now, I’m happy.

If you purchase of any of the products below, I earn a small commission to help support this blog, but you don’t pay a penny more. For more info, see my Disclosure Policy. 


Hope you enjoyed the post! Have you ever done a lampshade project? I’d love to hear about it in the comments.

Sharing with these link parties…

Be sure and check out the projects of my talented blogging pals below~

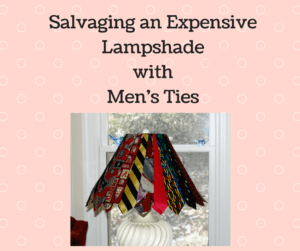
Before you go, here are 2 more favorite lampshade projects~

salvaging an expensive lampshade with mens ties

doily lampshade makeover

An InLinkz Link-up


Filed Under: Home and Garden DIY Tagged With: lamp DIY, lamp update, lampshade recovering, painting a brass lamp, relining a lampshade, repainting a brass lamp

Rescued Holiday Candoliers Get a Fun Makeover

January 25, 2018 by Florence 42 Comments

I’m going to tell you a little story about how Rescued Holiday Candoliers Get a Fun Makeover!

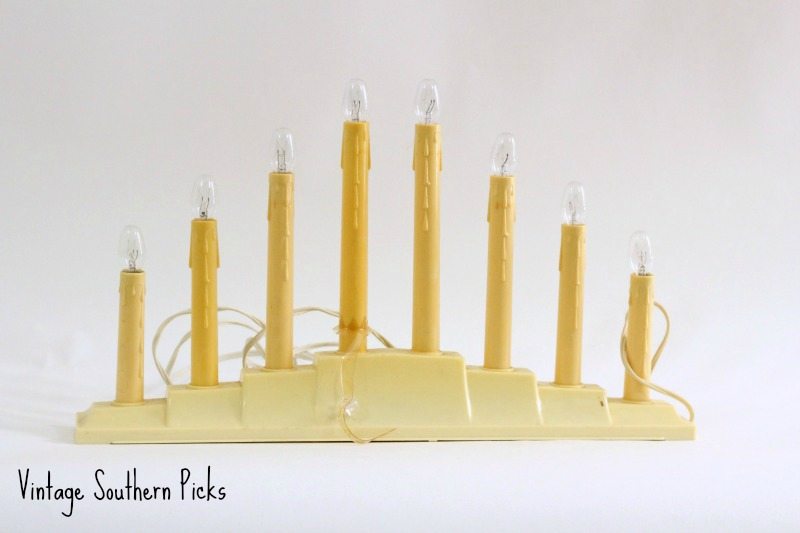
I usually buy these vintage plastic candolier sets when I go to yard or estate sales.

Believe it or not, they sell! In fact, a couple of years ago, I sold one of these bigger 8-candle sets to a person in Paris, France. The shipping alone was over $70 (!) because such a long candle set has to have a big box, putting it in the more expensive Priority Mail International category.

***Before you read any further, I wanted to mention this post is a part of the monthly Thrift Store Challenge. 

vintage-holiday-candolier-set
Original vintage Candolier set

The Rules:

  • Upcycle an item(s) from a thrift store, resale store, or garage sale into a new piece of decor.
  • There’s no monthly theme.
  • There’s no budget to stick to.

Meet the Hosts

Amanda | Domestically Creative – Pili | My Sweet Things
Angela | Simply Beautiful by Angela – Jeanie | Create and Babble
Molly | Just a Little Creativity 
Marie | The Inspiration Vault – Michelle | Michelle James Designs
Shirley | Intelligent Domestications – Dru | Polka Dot Poplars
Pam | P.S. I Love You Crafts – Gail | Purple Hues and Me
Jennifer | Cookies Coffee and Crafts – Toni | Small Home Soul
Sue | A Purdy Little House – Kathleen | Our Hopeful Home
Victoria | Dazzle While Frazzled – Marie | DIY Adulation Michelle | Our Crafty Mom – Debra | Shoppe No. 5
 Denise | My Thrifty House
Florence | Vintage Southern Picks – Ann | Duct Tape and Denim
Yamilette | The Latina Next Door – Maureen | Red Cottage Chronicles

Make sure you follow our board on Pinterest for more upcycled decor inspiration!


Before blogging, I sold through a booth getting lots of inspiration for projects from a blogger I loved. This candle project was inspired by Carol from ThePolkaDotCloset.com.

Back then I devoured everything Carol said, even though she warned that “what sold for her may not sell for you”. Sure enough, I was terribly disappointed my “Blinged Up Vintage Candoliers” didn’t sell. The now “duds” came home, were tossed in a box where they sat forgotten for 4 years.

blinged-up-vintage-holiday-candoliers
More Candolier Bling

During my latest post-Christmas purge, I found them again and plopped them quickly into the donation pile.  But as I recalled all the labor I went through for these masterpieces, I had second thoughts. I decided they might not be so “dud-ish” after all.

Maybe…just maybe I could rescue and use them!! That’s quite a revelation, you see, because I rarely keep anything I’ve bought for resale, even if I want it.

These Rescued Holiday Candolier Makeovers happened a few years ago before blogging, but I thought I would share with you how I revived them.

Basic Improvements for Vintage Holiday Candoliers

When I say “improvements,” if you’ve ever seen or handled these candolier sets, you know they’re flimsy and top heavy. They fall over constantly because they’re made of lightweight plastic with narrow bases. Some of the modern sets even come with suction cups so you can stick them to windows.

The Improvements:

  • I made up a solution of wet grout, adding it to the inside of the base. Believe me, it works wonders for these sets!
  • Allow to dry.
  • Then I covered the base with thin cardboard and felt to finish it.
  • Spray paint with color of your choice.
pink-and-gold-vintage-candoliers
Blinged up Vintage Holiday Candoliers

Decorate Candoliers with Bling!

This is the fun part, and the sky’s the limit!  I have a big stash of everything, but my problem is, I have a hard time thinking up clever ways to repurpose things. Is anybody else in this boat??? I have old jewelry bits and bobs, LOTS of doilies, buttons, ribbon…you name it. And of course, I can’t bear to throw any of it away because Murphy’s Law says, “as soon as you do, you’ll need it.”

Before Carol, I promise I didn’t know how to do anything. Growing up, we never did crafts at our house.

From Carol, I learned how to make fabric flowers.

From Carol I learned how to decorate things with old buttons and jewelry

From Carol I learned how to make use of broken pieces of china

From Carol I learned how you could even use stained doilies in projects (GASP!)

In fact, I’m certain Carol and my Mama were related because neither one threw anything away!

So I blinged up these candoliers with my homemade DIY flowers, stashes of stained doilies, broken jewelry, strips of bridal bling, old broken hair barrettes, bits of ribbon and buttons, bits of bead trim, a velvet rose from a box of candy, and a few stick-on rhinestones and faux pearls I bought.

pink-candoliers-with-bling
Pink Candolier with Broken Hair Barrette

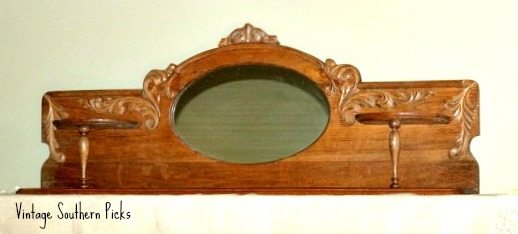
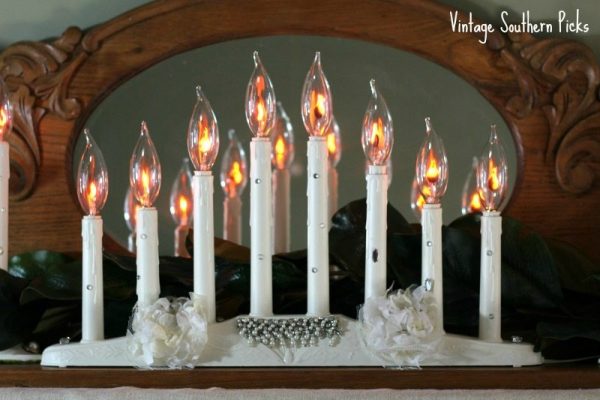
And the more I looked at my blinged up vintage holiday candoliers, the better I liked them! I was especially drawn to the ones I painted white. I decided to display them in front of an old oak piece we found last year at a yard sale for $20.

mantel-piece-without-embellishment
Antique Oak Mantel Piece

They looked good! Both hubby and I liked them, but something was missing.

Ah, the bulbs! Such masterpieces somehow deserved better than those old blah, boring nightlight bulbs. A search on Amazon and we found flickering candlelight bulbs. (Affiliate link below). We couldn’t wait for them to arrive and weren’t disappointed!

closeup-of-blinged-up-candoliers

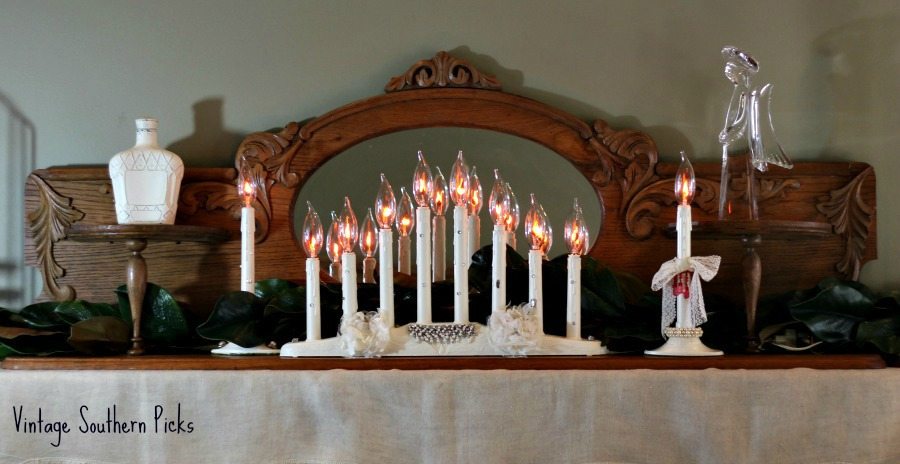
These vintage candolier sets look amazing on the mantle now, so good that I even splurged on a faux magnolia leaf garland to cover up the electrical cords. I can’t tell you how pleased we are with the whole set-up.

In fact, almost everything on this mantle is a thrift store, yard or estate sale find. From the beautiful carved oak mantle piece ($20), to the candolier set ($2), to the lead crystal angel, right ($2.50), to the white bottle on the left…liquor bottle I painted white ($1). I’m so lovin’ it! And the faux magnolia garland in the background, I adore because it’s so real-looking. ($30 something-affiliate link below).

blinged-up-vintage-holiday-candoliers-in-front-of-old-mantel
Rescued Holiday Candoliers


So go find you some of these vintage candolier sets and bling it up girls!

I’ve included suggested supplies below for your crafting convenience! If you purchase, I do earn a small commission to help support this blog, but you won’t owe a penny more! Go here for my full disclosure policy.


Sharing with these link parties!

PLEASE PIN!pinterest-image-for-rescued-holiday-candoliers-get-a-fun-makeover

And now for more thrifty goodness!

Check out what my fellow upcyclers created below!

An InLinkz Link-up


—


Filed Under: Home and Garden DIY Tagged With: bling in DIY, bling up vintage window candles, repaint holiday candoliers, repurposed window candoliers, thrift store finds., thrift store upcycle, thrift store upcycle challenge, upcycled estate sale find, upcycled thrift store find, upcycled yard sale finds, vintage holiday candolier makeover, window candle makeover

Found Forgotten Junk Makes a Sweet Vintage Vignette

October 26, 2017 by Florence 49 Comments

Today I’m joining with “Thrift Store Upcycle,” a favorite group of like-minded bloggers! Together we repurpose something “new” once a month using a thrifted find, but of course, it doesn’t have to be a thrift store find. It can be anything really…an estate sale find, a yard sale treasure, or even a curbside find. I absolutely love mine which is a combination of curbside find, shopping my house, and an estate sale find. Found forgotten junk makes a sweet vintage vignette! I enjoyed putting this together and I hope you’ll like it too! There’s no limit on how much we spend. My whole vignette cost only $1.00.


Thrift Store Decor Upcycle Challenge

The Rules:

  • Upcycle an item(s) from a thrift store, resale store, or garage sale into a new piece of decor.
  • There’s no monthly theme.
  • There’s no budget to stick to.

Meet the Hosts

Amanda | Domestically Creative Michelle | Our Crafty Mom
Vicki and Jennifer | 2 Bees in a Pod Pili | My Sweet Things
Angela | Simply Beautiful by Angela Kim | Made in a Day
Lindsay | Crazy Organized Marie | DIY Adulation Ann | Duct Tape and Denim
Denise | My Thrifty House Jeanie | Create and Babble Debra | Shoppe No. 5
Shirley | Intelligent Domestications Victoria | Dazzle While Frazzled Lora | Craftivity Designs
Maureen | Red Cottage Chronicles Jeanee | Centsably Creative
Florence | Vintage Southern Picks Deborah | Salvage Sister & Mister

Make sure you follow our board on Pinterest for more upcycled decor inspiration!


I found a pile of old snapshots at an estate sale last weekend, so picking out my favorites from that became a part of the vignette.

Pile of Old Snapshots
Old Snapshots from the 40’s-50’s Era

Others are personal photos from a vintage album my mother put together for my brother and me, and one is a vintage cabinet card. I’ll explain more as we go along. 

I love using unusual vintage objects to display photos! Here are a couple of unlikely junky, rusty pieces that make up the “found forgotten junk,” which you can see above too.

rusty-vintage-junk
Found Forgotten Junk


You’ll never believe where I found these unlikely pieces! The soap dish is from the estate sale, and isn’t a part of the vignette. The other two pieces came from an automotive storage yard. I have no idea what they were. Because the grate is made out of soft metal, it was pliable and easy to bend into shape. I fashioned the metal plate on the vice to form a photo prop. Then I simply glued it to the grate with E6000. It worked even though there wasn’t much surface area for the 2 pieces to join. The vintage metal clamp was in my stash, and the rose at the top is a bit of jewelry scrap, which also came from an estate sale. It now makes the perfect little easel to display vintage photos!


junk-frame-easel


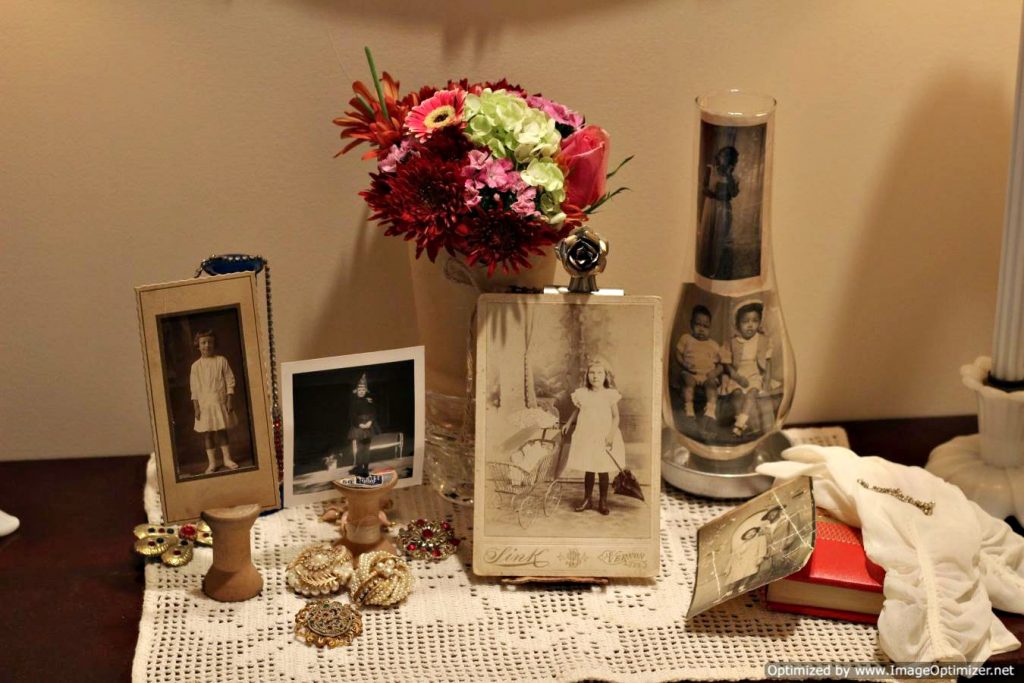
Here is the final look! I’ll show the individual parts below.


vintage-photo-vignette

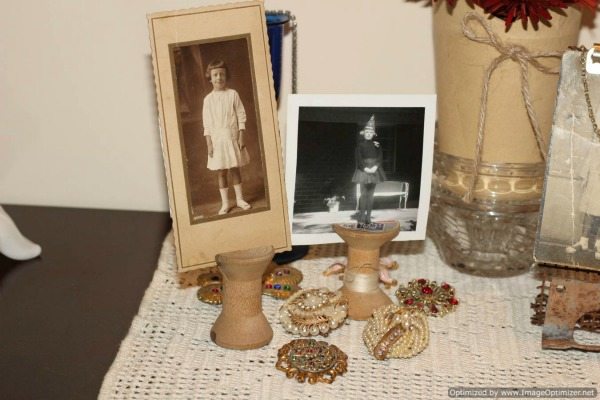
You see vintage wooden sewing spools are holding the 2 photos on the left.

You can also see part of my vintage brooch collection.

Who are those people on the left?


people-in-the-left-of-the-old-photo

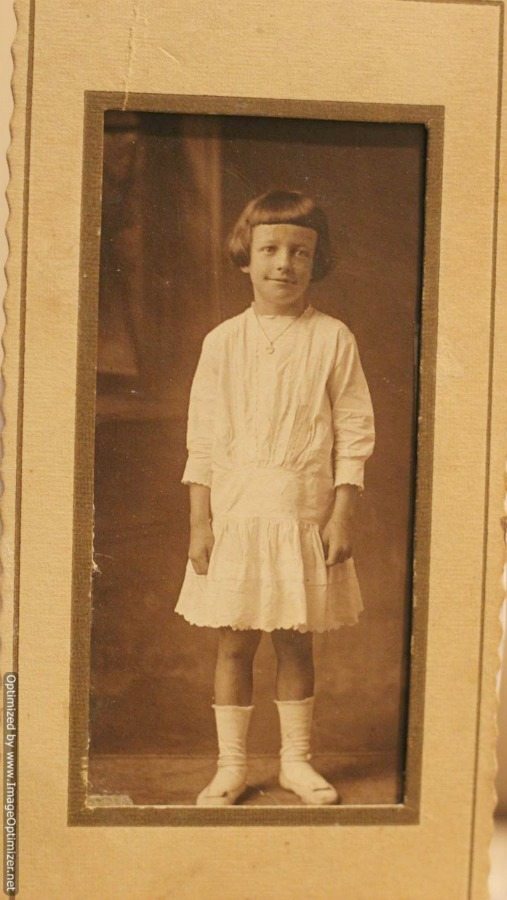
My Mother at 8 yrs old in 1918

my-mother-at-8-years-old-in-1918

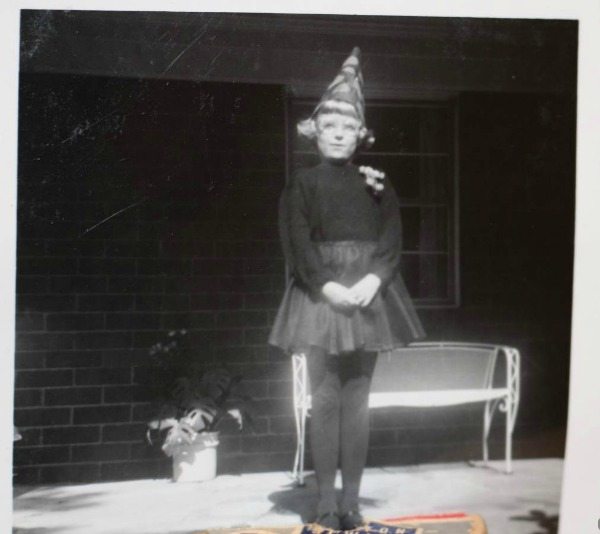
And me at 8 yrs old! You can see how tall I was! I’m wearing a Halloween costume my Mother made for me (which I didn’t appreciate at the time because I looked vastly different from all the other kids.)

I used to get dirty looks from parents whose homes I went to for trick-or-treating with my friends.

Years later I understood why.

Me-at-8-yrs-old


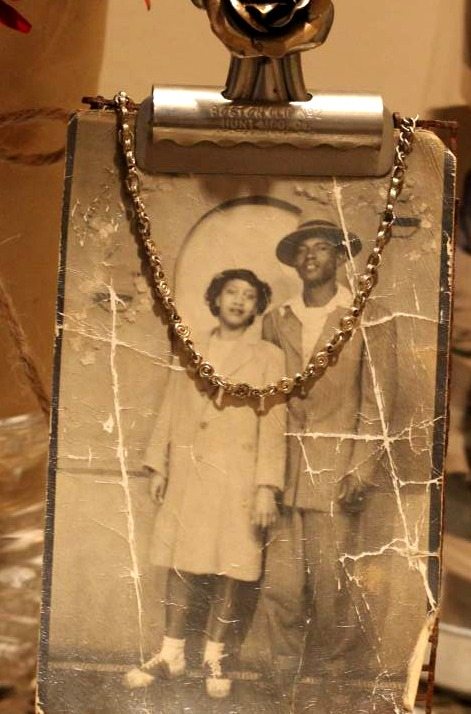
Here is “The Couple.”

One of my favorite photos from the estate sale.

Are they at a prom? A sock hop? Church?


the-mysterious-couple
The Couple

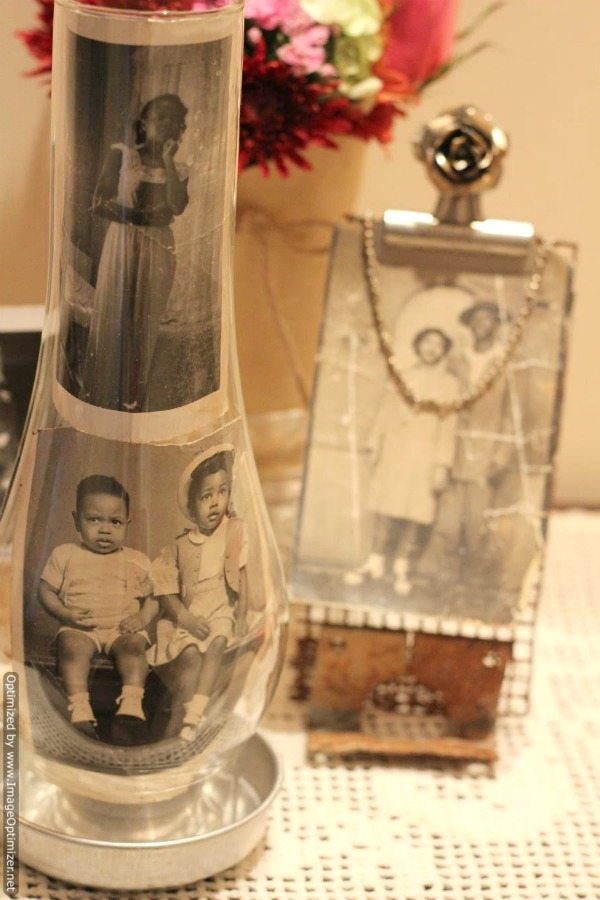
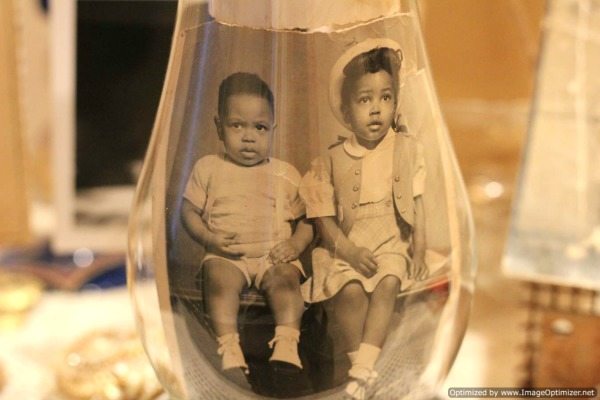
I’ve seen photo displays in glass jars. Here I’m using a glass chimney from an oil lantern. 

glass-chimney-photo-display


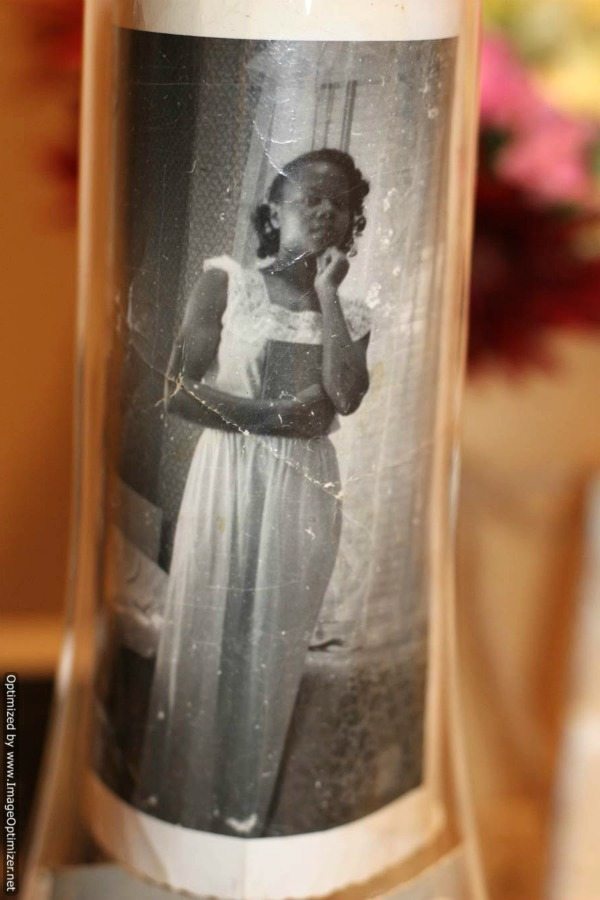
Displaying 2 more favorite photo finds from the estate sale….

I call her “Wistful”


i-call-her-wistful-old-photo


And “The Babies” look like they’re in their Easter finery.

Look at that boy’s expression!

I’m not sure he trusts the photographer!


the-babies-vintage-photo


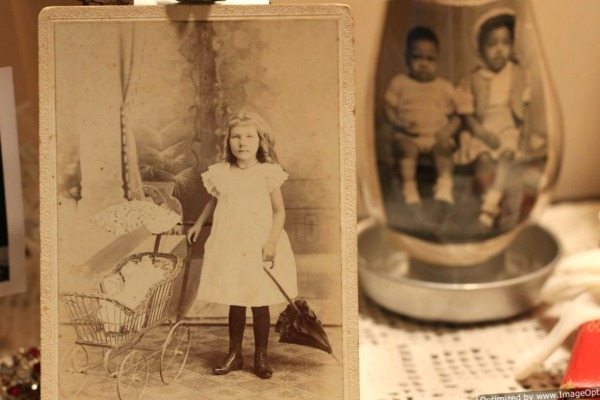
And a final way to use the Found Forgotten Junk Easel…

found-forgotten-junk-easel


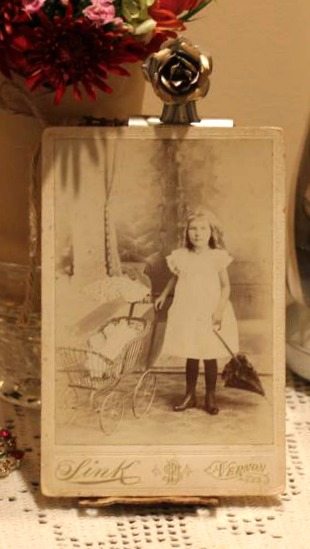
…is with this vintage cabinet card 


display-a-vintage-cabinet-card


Hope you’ve enjoyed the sweet vintage vignette! I’ve enjoyed showing it to you! 

More projects below!


And now for more thrifty goodness!

Check out what my fellow upcyclers created below!

An InLinkz Link-up


—


Filed Under: Home and Garden DIY Tagged With: displaying old photos, DIY photo stands, remade junk, using junk to display old photos

“Raking” in Autumn with a Jazzy Front Door

September 28, 2017 by Florence 35 Comments

“‘Raking'” in Autumn with a Jazzy Front Door” should conjure up an image of an old rusty rake, and if so, you’d be right. I’ve been waiting to show you a unique-to-me door decoration for Fall I completed a couple of weeks ago. And just in time, too, for the monthly Thrift Store Upcycle Challenge.

Thrift Store Decor Upcycle Challenge

The Rules:

  • Upcycle an item(s) from a thrift store, resale store, or garage sale into a new piece of decor.
  • There’s no monthly theme.
  • There’s no budget to stick to.

Meet the Hosts

Amanda | Domestically Creative Michelle | Our Crafty Mom
Victoria | Dazzle While Frazzled Pili | Sweet Things Debra | Shoppe No. 5
Chelc | Inside the Fox Den Jeannee | Centsably Creative Michelle | Michelle James Designs
Molly | Just a Little Creativity Angela | Simply Beautiful by Angela
Marie | DIY Adulation Denise | My Thrifty House Lindsay | Crazy Organized
Florence | Vintage Southern Picks Shirley | Intelligent Domestications

Make sure you follow our board on Pinterest for more upcycled decor inspiration!


I found the old metal rake head half buried at the back of a barn waaay out in the country when hubby and I attended an estate sale in the middle of sweltering Summer heat…


The kind of heat that totally saps your energy.

The kind of heat that immediately has you sweating as soon as you step out of the car.

That’s Alabama.

And when it’s that hot, I swear…all you want to do is sit in the AC! The house wasn’t air conditioned either, but I persisted, and was glad I did. I found a whole lot of goodies that day and hopefully, I can show you in an upcoming vintage finds post.


Let me tell you a little about the Thrift Store Upcycle Challenge, in case you didn’t read all the above. If you’re not familiar with it, a group of us bloggers challenges each other to come up with a newly upcycled item using a thrift store, yard sale, resale store, or estate sale find. That’s right up my alley because I always have plenty of those. There’s no budget or theme and I love that because it allows creativity to soar.


I’ve seen several cute crafts with rake heads that look like this. Yes, I’ve raked many a leaf pile with one of these.


old-leaf-rake


But…the one I found looked like this! Just picture…no handle and rusty and you’ll have it. I’ve actually raked leaves with one of these, but it’s much harder, because this kind of rake is really for leveling soil. Use this to rake leaves, and you’ll rake more than leaves. You’ll pull your grass out too. 


soil-rake


We’re not working in the yard now though. The plan is to jazz up the front door with the rake head, but our front door is a glass storm door and one we use constantly. The challenge is to find a way for it not to bang the glass, which is impossible. (Been there, done that). So even though I said it’s going to hang on the front door, it won’t. It will land on the front porch instead. 


So here’s what I started with:

rake-head-supplies-for-fall-arrangement


  • Rake head
  • Sprigs of Fall leaves from the Dollar Store
  • Dollar Store Leaf Garland
  • Florist’s wire
  • Wire cutters


I only used the garland, and one of the leaf clusters, and not the green spray at the bottom of the photo. And though, we don’t have to keep score on what we spent, the rake head cost me a whopping 10¢, the leaf garland and leaf clusters were $1 each, so total I spent on this was $2.10. I already had the florist’s wire and wire cutters, and I’m not counting the other two things I didn’t use.


I put the leaf garland on first, wiring it down, and of course, it looked puny, but this is just the beginning.


leaf-garland-first


I planned to fill in the gaps with snips from the leaf clusters, but they were wrinkled and didn’t look right. Can you iron these without melting? I had no idea, but gave it a try, and it worked fine. Ironed the leaves and started wiring them on the rake head.


The whole process really didn’t take long, and I’m ashamed to say I forgot to take a photo of its semi-finished state. I liked it, but something was missing. Ah, a bow! So I hustled myself down to Michael’s to find a burlap bow.


“We don’t have pre-made burlap bows,” the clerk said perkily…while filling a wreath with burlap bows. Whaaat? Michael’s doesn’t have pre-made burlap bows??? You mean to tell me everyone in the whole wide world makes their own bows, and I’m not gonna find a pre-made bow in a craft store??? I was incredulous.


I did find a semi-burlap-y pre-made bow I liked. Please tell me all you crafters out there don’t all make your own bows! (I have to have a little help in the bow-making department.) Anyway, the bow came in 3 parts. And even a slightly craft-challenged person like me can manage to put the bow together! LOL


pre-made-burlap-y bow


And I simply wired it onto the side of the rake. Voila! My finished masterpiece to jazz up our front porch!


rake-head-arrangement-with-owl


And a close-up. You can actually see the rake a little better here.


rake-head-arrangement-closeup


PIN PLEASE! THANK YOU!

raking-in-autumn-collage-pin

Hope you enjoyed my jazzy door decoration, that’s not a door decoration, but shhh, we won’t tell.


Update:

This is where I put it, and though, it’s not on the door, it’s very close. I love it propped on that old metal frame that already lives by the door anyway!

Final Halloween Porch Reveal coming soon!


metal-frame-before
Metal Frame Before


metal-frame-after-with-rake-head-arrangement
Metal Frame After


Sharing with these Link Parties….


And now for more thrifty goodness!

Check out what my fellow upcyclers created below!


Filed Under: Home and Garden DIY Tagged With: fall arrangement, fall door decor, fall porch decor, making a rake head arrangement

  • 1
  • 2
  • 3
  • Next Page »

I’ve Been Featured…

ive-been-featured-link-party-buttons
oh-my-heartsie-girl-wonderful-wednesday-button
snickerdoodle-button

Beezer…Over the Rainbow Bridge 2017

Vintage Southern Picks on Etsy

Vintage Southern Picks on Etsy

Everything Square Dance & Western on Etsy

Everything Square Dance & Western on Etsy

© 2017 Vintage Southern Picks | All Rights Reserved

Disclosure: Some of the links on this website may be affiliate links. When you make a purchase from these links, I earn a small commission.