
Last weekend we rearranged a little furniture. Took pieces to the attic I was tired of, and brought new ones down. I wanted a desk in the Great Room where we spend most of our time, so we man-handled down a little handmade desk my aunt gave me years ago. In the process, I found this cute little desk lamp in the attic I had forgotten about.
The only thing is, it’s a bit overly shiny brassy, and the lampshade is boring, but the lamp is just the right size for the space.
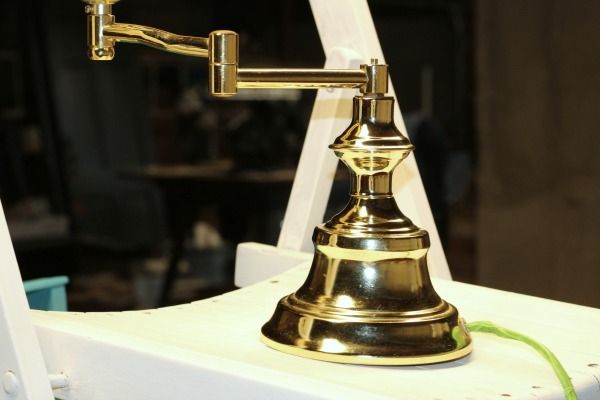
Since C’mon Get Crafty, or “Craft Room Destash,” as it was formerly called, was coming up, I thought about updating the brassy lamp with a bit of paint and scrapbook paper as my project for the month.
I have loads of scrapbook paper, napkins, old magazine pages I picked up free at a garage sale…lots of things with which to update the lamp, and give it a bit of shabby chic love.
Before we get on with the project, here’s a little info about C’mon Get Crafty.
[clickToTweet tweet=”What crafty creations could you make today from YOUR craft stash?! #CraftRoomDestashChallenge” quote=”What crafty creations could you make today from YOUR craft stash?! #CraftRoomDestashChallenge”]
If you’d like to join in the Craft Room De-Stash Challenge, you can request to join our Facebook group here!
How to Update a Brassy Desk Lamp with Paint and Scrapbook Paper
Painting the Lamp:
- Don the paint clothes
- Set up the high end paint station
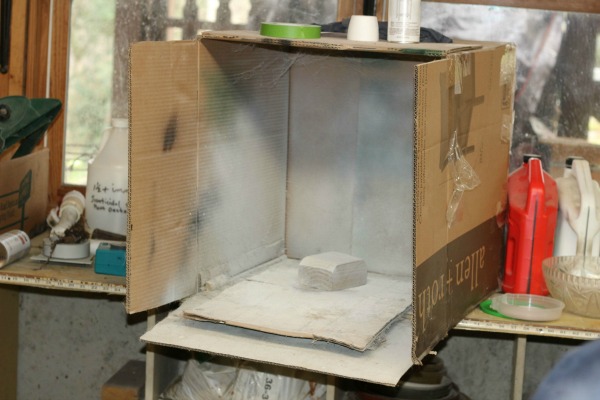
High End Paint Station - Use masking tape or Frog Tape to protect the parts of the lamp you don’t want painted
- Spray paint the lamp with primer first (I used Zinsser Primer). It dries very fast. I applied 2 coats.
- Follow with your main paint color. I used 2 coats Krylon Classic White Chalky Finish paint.
Updating the Lampshade
The lampshade was pretty ho-hum to begin with, and the pleats quite brittle from being exposed to years of attic heat. Trust me, the photo is much too flattering!

The most time-consuming part of the project was making a template for the inside of the shade.
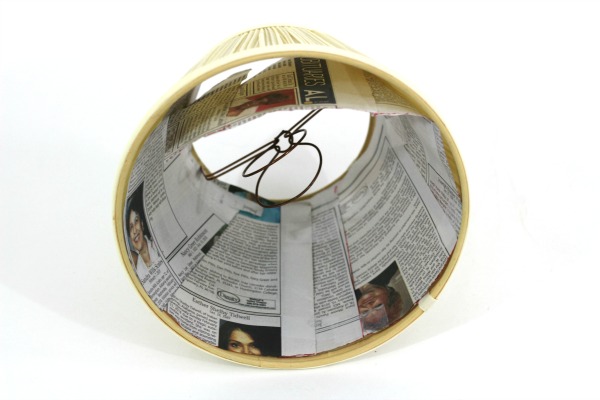
I did that by piecing together strips of newspaper around the inside of the shade to get the correct dimensions. Here’s the finished template.

I found scrapbook paper I liked when I was fooling around one night trying to get a new look for the shade.
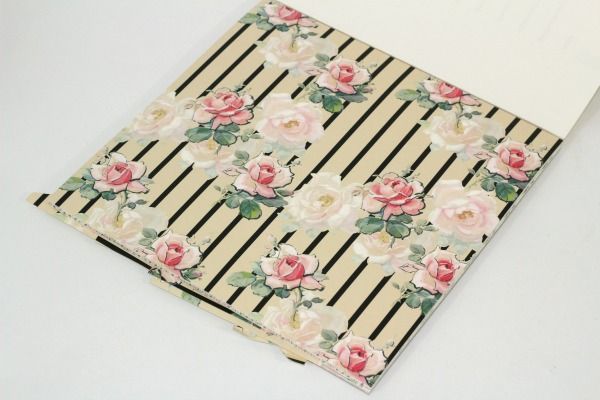
I was worried that stiff scrapbook paper wouldn’t adhere well to the inside of the shade, but it did.
It helped that there was a smooth plastic inner lining rather than lampshade fabric, which would not have worked.
Simply place your newspaper template on top of the scrapbook paper and trace around it, BUT…
TIP #1: Make sure that your design is right side up. (ask me how I know this.)
TIP #2: Make sure you’re tracing around the correct side of the paper.
TIP #3: The process is easier if you choose paper with a uniform design.
Due to the square size of the scrapbook paper, the final lampshade liner was in 2 pieces, making it harder to match the design..
Once you have your 2 pieces and know where to line them up inside the shade, you’re ready for Mod Podge.
You need to work quickly, mod-podging the design side of the paper to the inner shade lining, which also should be mod-podged for good adherence.
Fit your new shade lining into the shade (and pray)!
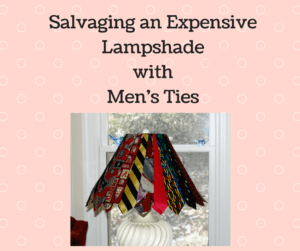
As I told my husband, when I do a project, I want to do it perfectly. Ha! And this isn’t perfect. But it turned out a huge improvement over what was! The outside pleated shade gives a muted look to the paper and I really love it near my curtains.

If needed, there are ways to disguise lampshade mistakes such as gluing on buttons, ribbons, or doilies so that they look intentional. I may glue some trim over the top and bottom rims of the shade for a bit of extra bling, but for now, I’m happy.
If you purchase of any of the products below, I earn a small commission to help support this blog, but you don’t pay a penny more. For more info, see my Disclosure Policy.
Hope you enjoyed the post! Have you ever done a lampshade project? I’d love to hear about it in the comments.
Sharing with these link parties…
Be sure and check out the projects of my talented blogging pals below~
Before you go, here are 2 more favorite lampshade projects~

Florence
Latest posts by Florence (see all)
- The Latest Vintage Hauls - February 10, 2020
- A Vintage Fall Haul - November 3, 2019
- September Sales on Etsy and My New Antique Booth - September 30, 2019
- Camping Trip Thrift Store Haul - August 2, 2019
I love the way your brassy lamp turned out Florence. The scrap book paper behind the lampshade looks so pretty when the light’s on. We have one of those lampshades that have seen better days and I’ve been struggling to figure out how to make a new shade for it. Now I know. I think I’ll give this a try
Thanks Michelle. I’m glad I’ve given you a bit of inspiration. I hope you do & good luck with your shade!
That turned out so pretty Florence! I think it always feels so good to give something you already have a fresh new makeover instead of spending money to replace it.
Tania
You’re right Tania. Thanks so much!
A person can cut out a silhouette of a desired form to put inside the shade as was done in your example. I always get rid of the crinkley stuff-all it does is hold dust. I have also covered many a shade-easy to make a pattern.
You’re right Kathleen. When I was having a look at the scrapbook paper, and some of the sheets had cutouts, and they looked really nice when the light was on. How do you get rid of the crinkly stuff, or did you just tear all the fabric off? My biggest problem with redoing the outside of a shade is making the template. That always gives me fits.
I would never have thought to put the paper on the inside like that. Love it! I also love the high-end paint station. 😀
Haha, everyone loves the high end paint station, LOL. The idea to put the paper on the inside was a lucky light bulb moment.
Very cool idea, Florence. I love redoing old lampshades!
Thanks Kim. It seems I have a thing for lampshades since this is my third project, LOL.
What a bunch of great ideas! I love the high end paint station for starters. The paper design on the INSIDE of the shade is a great idea with the fabric shade muting the overall look. I have so much stuff here that could be refurbished it would keep a crafter busy for years.
Ellen, I would love to see your treasure trove of stuff you’ve got! I bet I could learn a lot from you. Wish we lived closer together!
Love the lamp shade with the scrapbook paper showing through. Paint is always an improvement over shiny brass. Wonderful makeover.
Thanks Sharon! I was very pleased with how it turned out.
Great job Florence! No more brassy desk lamp. It looks so much better now, I’m not a big fan of brass, and I really love how the lampshade mutes out the scrapbook paper where you can see it. But its not so bright.
Thanks Linda! I enjoy the whole look so much!
What a great transformation! I love the difference your gorgeous scrapbook paper makes. -Marci @ Stone Cottage Adventures
visiting from the de stash challenge.
Thanks Marci!
What a great job. The lamp has some style and just the right amount of shabby chic.
Thanks Debra! I’m enjoying it so much.
Love the way that paper looks with the fluted shade over the top and the light shining through. And your paint station is brilliant. 🙂
Thanks Dione!
Very clever. Thanks for the inspiration.
Thanks Denise!
This is beautiful! The paper inside is so pretty and it looks great in white. Great update!
Thanks Michelle! I appreciate it.
Terrific job!!!!!
Thanks Deborah!
As I read about your project, I looked up at my lamp on the entertainment center which bookends my computer desk. Same lamp, different shade. My brass isn’t blinding caz it has a nice even layer of dust on it! Oh, well! My lampshade is more flared. I love newspaper for a template; it creases with a fingernail so that you can cut it out on the crease (I use this when wallpapering dollhouse walls). Mistake? just take another piece of newspaper! I hate dark lampshades so this is a great solution. I bet an all over pattern wallpaper might be pretty too, but more opaque.
One easy way to get the proper width for the OUTSIDE of the shade is to start with a BIG piece of paper and roll the lampshade across it, marking the top and bottom as you go to get that flared shape. I don’t know if I could trim it to fit the inside, but it’s great if you are covering the outside with a new fabric.
Love your spray booth; although we had a great exhaust fan system where I used to work, we used a cardboard box (with a small lazy susan) for our booth. When the paint was so thick it started getting dusty, we just got a new box!
Don’t you know it…I thought the same thing about using the newspaper! You know, I’ve pulled my hair out before trying to cover the outside of a lampshade by rolling it along over paper. Never could get it to turn out right. I took a chance and glued my fabric over it anyway, and it turned into a huge mess….had to throw the lampshade away, but now I’m sorry, b/c could have thought of more things to do with it. At the time I was disgusted.
Great idea about the lazy susan! I was wishing I had one when I was painting that.
Looks great !! Thanks so much for stopping by!!
Hugs,
Deb
Thanks so much Debbie!
So cool that you took something that was sitting unloved in the attic and gave it a makeover and new life.
Thanks so much Super Mom! I’m loving it!
I love your “high end paint station”! And I have a lamp very similar to this – looks like a great way to update it!
Thanks Roseann!
Florence, you’ve had me cracking up when I was reading about your high-end painting Station. But seriously, though: What a FAB idea to use an old box for spray painting!!! I might have accidentially spray painted the floor in my hallway when I only used a piece of cardboard for protection. Or maybe not, lol. Also I like that you share your oopsies with us. I think you’re not a realy crafter and DIYer if all projects work out just as invisioned on the first try 😉 Because that is when you have to get really crative…
You’re so right Habiba! Thank you for that encouragement. Thanks for dropping by too.
That is a very clever way to update a vintage lampshade! Great job on this Craft Room Destash Challenge!
Thanks so much Megan!
Florence you make me laugh so much. You definitely need to don work clothes for these projects. I always forget and end up having paint on all my clothes. Love what you did with this lamp and that idea with putting the paper inside was very clever indeed. I think it looks so much better now.
Thanks Mary. Glad you enjoyed it! I think the lamp looks better too.
Hello Florence! Your “new” lampshade turned out great! I love the idea of using some scrapbook paper or old wallpaper inside and it really gives it a nice look with flowers but sort of like watercolors. Thanks for posting it on Sweet Inspiration today!
Have a great weekend,
Barb 🙂
Thanks Barb! Appreciate your comment & encouragement! I love it too.
Florence, I love the after of your lamp update! That scrapbook paper is perfect. You have inspired me to do a lamp update for my sewing room. Thanks!
xo Dianne
I appreciate it so much Dianne! Glad you’ve gotten inspired by my project.
Love the updated lamp. I have successfully painted several lampshades using regular paint – not spray paint. I love to re-do lamps and the first one I painted was when I first moved into my current home 12 years. My bedroom and master bath are painted in a Behr paint called Sweet Petal. which is a cross between a pink and a lavender – sort of the same shade as mauve but much brighter – none of the gray tones like in mauve. I found a beautiful lamp that is almost the same color as the walls but is glass – you know, the ones you see through. I couldn’t find a shade I liked so bought one in a gray-beige color that was the right size and I like the shape. I mixed my wall paint with a little of another color(maybe white – can’t remember) to make it look different that what was on the walls and it came out perfect. I hot glued trim on top and bottom of share and added jewels where the trim had little spaces in it. It is perfect and still looks great after all these years. Since then, I have painted at least 3 others and added trim to them and to some others with plain white shades – they are all in my bedroom (it’s very large and very girly) and I love all of them. I have my eye on one in our family room that is too fancy now that we have re-done the room. It is the perfect lamp for it’s spot but I am going to re-do the shade so it goes better with the rustic decor. I had major foot surgery three weeks ago and will be in a wheelchair another 3 weeks so painting is not an option right now. Thanks for sharing all of your great ideas.
Carol
Carol, this is so interesting! I can’t believe you used regular paint on the lampshade, but I’m encouraged to hear that it turned out successfully. I love hearing about the techniques you used on the shade. It sounds really cute. Love the idea of putting jewels where the seams come together. It sounds like something I want to see!
Isn’t it fun to revamp a lamp? I’ve always gotten great satisfaction out of transforming lamps and/or shades, I’ve done a few in my day. My favorite (and most popular one) was a shade I covered in a lace tablecloth! Kid you not:) Love what you did with the floral paper and white paint – perfect! Thanks for sharing at Vintage Charm! xo Kathleen|Our Hopeful Home
Yes it is fun to play with lamps! I’d like to do more & more need to be done around here for sure! Oh I bet the one using your lace tablecloth is pretty! Is it on your blog? I’d like to see how you did it.
What a great transformation! I spray painted a brass floor lamp years ago and it’s time to spray paint it again, thanks for the reminder.
Thanks Emily! I have a floor lamp here that needs attention too.