• Home
  • About
    • About Me
    • Contact Me
  • Etsy Shop
  • Link Parties/Featured
    • I’ve Been Featured
    • Sweet Inspiration Link Party
  • Personal Diary

Vintage Southern Picks

Cheapskate Picker Sharing Finds, DIY & Selling Tips

Facebook   Twitter   Pinterest   Google+   RSS
  • DIY Projects
    • DIYs to Sell
    • Holiday/Seasonal
    • Home and Garden DIY
  • Home and Garden
    • Home Organization
    • How I Organize My Ebay/Etsy Home Office
    • Home Tours
    • Party Games
  • Selling Tips
    • Buys I Avoid
    • Shipping
    • What’s Selling on Etsy/Ebay
    • Yard Sales
      • How to Give a Yard Sale
      • What Not to Say in Yard Sale Ads
      • Yard Sale Humor
  • Vintage Finds
    • Thrift Store Finds
    • Mystery Items
    • Yard/Estate Sale Finds
    • Vintage Junk Giveaways
  • Disclosure Policy
  • Privacy Policy

Vintage Pick That Became a DIY Headache

May 21, 2017 by Florence 62 Comments

Would you like to know about the vintage pick that became a DIY headache? I’m depending on YOU to tell me if it’s a happy ending! Final reveal at the end!

A year ago I attended an estate sale in a historic part of town. One of my most memorable finds was this….

elgin american beauty compact carryall
Elgin American Beauty Compact

…a vintage gold Elgin American Beauty compact carry-all dating from the 50’s-60’s. Bought for $5. Sold in my Etsy shop for $125! This was such a pretty piece in wonderful condition! (I had to get the estate sale person to show me how to open it.)

 Finding the Homemade Tool Chest

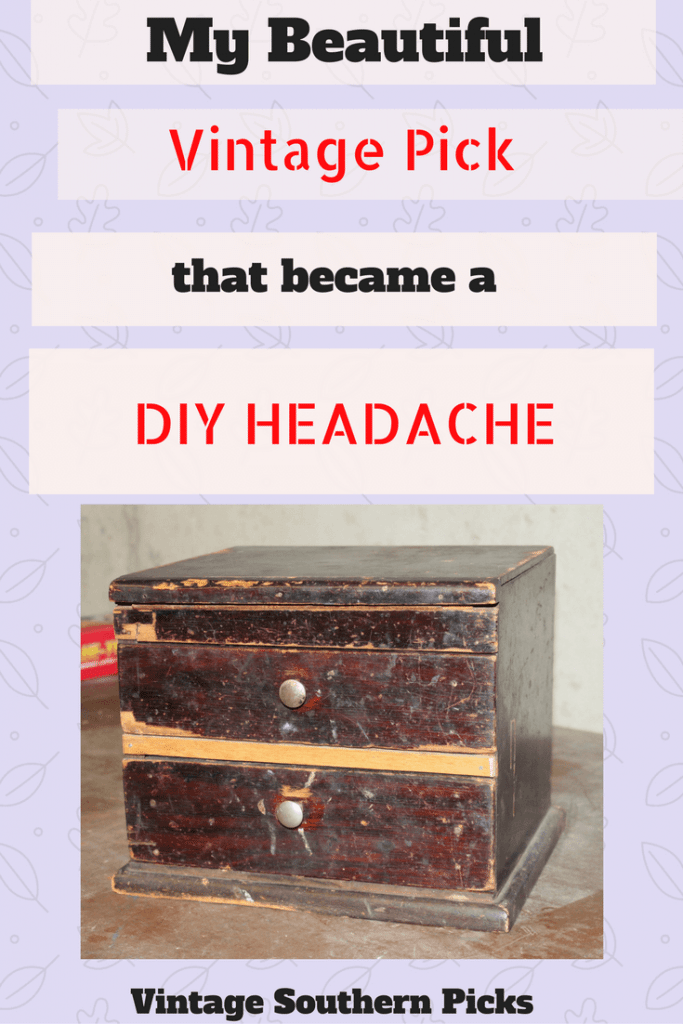
But the real find of the day….my absolute favorite….was this! It looks rough, I know. A homemade tool chest & dirty. At the sale it was sitting on the floor & loaded with screws, bolts, and the like. Isn’t it cute though? I fell in LOVE!

homemade tool chest in original state
Tool Chest in its Primitive State

It had great bones, and when I saw that the top lifted up, I was sold. Paid $5 for the chest & all contents.


homemade tool chest lid lifts up
Lid Lifted Up

And the inside of the drawers was very primitive.

primitive tool chest drawers
A Primitive Interior

 Transforming the Homemade Tool Chest

It sat in the basement for a year.

When I finally got around to working on it, I removed knobs and gave it a good sanding.

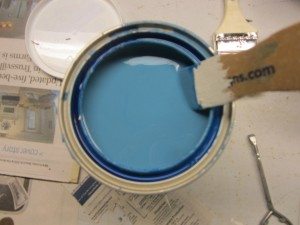
I couldn’t wait to put on the first coat of paint! Annie Sloan “Old White.”

To my chagrin & horror, the next day it was PINK! Oh well, “it just needs another coat of paint,” I told myself.

More paint applied. Pink again the next day.

More paint….still pink.

More paint…pink.

More paint….pink.

MORE….p..p..p..p..pink!

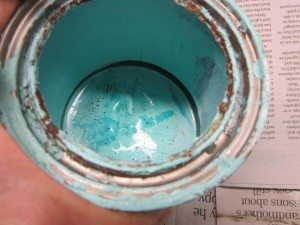
Okay. “What we need is some stain-blocker paint,” I told myself confidently. Ah! Found some oil-based in the basement. How old was it???Who knows! Who cares? Slapped that on….WHAT??? STILL PINK!!!???

Well, it just needs another coat of Annie Sloan! Putting any kind of paint on top of oil-based….not a good idea. I knew better, but I was getting slightly desperate.

The results? P-I-N-K!!!

Resignedly, I dragged to Home Depot. Dreading buying a whole gallon of stain blocker paint, I was delighted to find a quart of Zinsser Gray Stain-Blocker Oops paint. “Great! We got it licked now!”

Do I even have to tell you??? P…I…N…K.

stain blocker paint on old tool chest
Covered in the 2nd Stain Blocker

So how come this works on all the other dark stained wooden items I’ve got???

Pinterest image for DIY Headache

This calls for another coat of Annie Sloan….Nope…..Pink.

I was beginning to despair. I was beginning to wish I’d never laid eyes on this !@#$%&* chest. Fickle me. I had fallen out of love.

I considered covering everything with decoupage. Nope. Didn’t want to do that either.

I considered painting it pink.

I considered painting it black.

I considered chunking it.

no, No, NO! I will NOT give up!

Okay. When all else fails, ask Google. Google suggests shellac. Noooooo! I don’t want to strip this down to bare wood!!!!! It’s got at least 10 coats of paint on it! But I found a suggestion for shellac that works OVER paint. And we just happened to have some!

Slap that stuff on & wait for the miracle of no-bleed-through. Right? Uh…not exactly. I used only 1 coat. Should have used 2, but it WAS much better.

So I felt I could FINALLY progress with this project, instead of endlessly slapping paint on it day after day. I was making a career out of painting this and getting nowhere!

painted and refreshed homemade tool chest
Pondering Decoupage Design

I planned to do some decoupage all along. Decisions, decisions about what kind and the design.

The Transforming Plan:

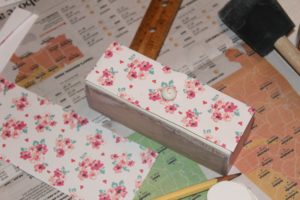
Napkin decoupage to the drawer fronts

Paper decoupage to drawer sides

Paper decoupage to drawer bottoms

New Knob for top

New Knobs on drawers

Stencil of some kind

Bottom napkin won out for drawer fronts~

choice of 2 decoupage napkins
Pondering Decoupage Napkin Choices

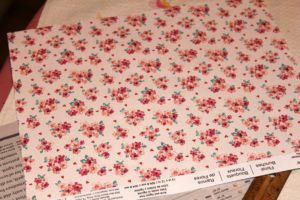
Found paper that looked like old letters~just sand the corners back a bit so it looks worn. Apply “Walnut Ink Antiquing Solution” to give it some age~

aging decoupage paper
Aging the Decoupage

Can’t make a choice, so mix n match papers on the insides of drawers~

choosing between papers for lining drawers on homemade tool chest
Decoupaged Drawers

I found a French stencil I liked on Amazon, and applied it to the top.

Stenciled lid of the Tool Chest turned jewelry chest
French Stencil on the top of Lid

Also stenciled under the top lid.

Under the top lid of the old tool chest
Stencil inside top of Lid


And made a trip to Hobby Lobby for knobs. Found 4 other knobs in my stash to use for legs. I can’t decide whether I like it with legs or not. What do you think?
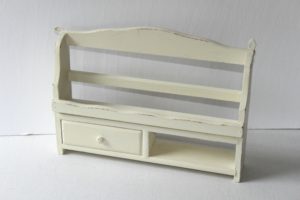
Final result!!

The final result....the finished tool chest
The Finished Tool Chest Makeover

And here’s the back….

Those 4 holes were there originally. The only thing I can think of is to cover these with buttons. Do y’all have any other ideas?

the back of the tool chest
The back of the toolchest

Is the pink gone? NO! You can see it up on the top edges in this photo. I can also see it just under the paint in various places. Uh oh, I might have to take up that career again. But at this point in time, I probably won’t do anything. Maybe later.

What do you think of the DIY Headache????

Sharing with these link parties here~


Filed Under: DIY Projects, DIYs to Sell Tagged With: DIY headache, homemade tool chest, tool box makeover, tool chest makeover, upcycling a tool chest

5 Clever Ways to Display Vintage Hankies

March 26, 2017 by Florence 32 Comments

With help from 2 blogging friends, I’m showing you 5 clever ways to display vintage hankies. On Ebay a few years ago, I sold about 30+ lovely vintage hankies to a lady, who was a difficult buyer for reasons I can’t remember now. To my horror, she revealed how she intended using them. I shuddered. If you’re still reading, I will reveal the use further down. In any case, it was the last time I ever sold these pretties in a lot.

Vintage hankies are lovely works of art to be treasured, handed down, and enjoyed. But don’t just fold and put away in a drawer, or do what my buyer did. Display them! Use them, but please…not to blow your nose!!

Here are 5 Clever Ways to Display Vintage Hankies!

Lois Behr Christensen from Walking on Sunshine, shows us how a handkerchief tenderly made by her grandmother, was treasured as part of her daughter’s bridal bouquet!


5 clever ways to display vintage hankies


Jennifer Zuri of Town and Country Living shows us a lovely hankie banner! Doesn’t this look sweet above her china cabinet? Check out her blog for other attractive displays!


5 clever ways to display vintage hankies


Use hankies as wearable art! I got this pretty idea from Jenny Brown at Shareably. My favorite ideas were these lovely bows and rosettes, which can be worn or displayed on packages, wreaths, and frames. And I love the fact that no gluing is involved, so you don’t ruin the hankies! (Easy tutorial on the web site.)


5 clever ways to display vintage hankies


Can you tell the bow in the middle was my first one?? It is a bit lopsided! I promise you it is an easy tutorial though…if I can do it, anybody can. I love to wear unusual boho things like this because it gives me a bit of a distinctive look!

Lastly…I am displaying a vintage hankie in an old metal frame. I found the frame on the floor of a dark dank wooden closet at the Tiny Estate Sale.


5 clever ways to display vintage hankies


Wish I had taken a before photo of how truly icky it was, but it was only $1, so I bought it, brushed off as much rust as I could, painted the metal parts of the frame with Annie Sloan Old White, and began working on the glass. My vision was to leave some of the silvering for a streaky look like this….

I soaked the glass in a vinegar bath for several hours. Then it is easy to remove the silvering. From what I’ve read, oven cleaner will work, but I haven’t tested the method.


5 clever ways to display vintage hankies

Turned out I hated the streaky look. It looked dirty to me, and it sure wasn’t going to do a beautiful vintage hankie any favors! So I decided to clean the rest of the old silvering off to reveal a clean glass slate.

Figuring out how to display the vintage hankie in the frame was the next hurdle. Wish I’d done a bit more investigating on Pinterest and youtube before I started because this took a bit of trial and error to get right. It’s still not perfect, but I’m happy with the end result.

Trial and Error Method of Displaying a Vintage Hankie in a Glass Frame:

I used the original cardboard backing as a guide to make a new backing, matching the dimensions of the frame.

I painted the cardboard white because tiny parts of it will show through.

I mod-podged a piece of crochet to the bottom half of the cardboard. Mistake…it was too thick and the finished piece wouldn’t go into the frame.

I mod-podged the hankie onto the cardboard and let it dry. Mistake! Shouldn’t have glued it & shouldn’t have let it dry. When all put together, the hankie hadn’t adhered well, and there were BIG wrinkles. 

Tried to pull it off after it was dry. Mistake! The hankie tore in several places. Should have wet it first, but didn’t want to ruin the painted cardboard, but I had to redo this anyway. 

THEN I looked at some youtube videos to figure out how to do this properly!

I cut another piece of cardboard and painted it.

I cut a piece of wide flat lace and glued it.

I put a few stitches with needle and thread into the 2 side points of the hankie and the top, sewing directly into the cardboard. A large needle makes this easier. Voila! Much better than mod-podging. I used the same hankie, hiding the holes underneath the cardboard.

Like I said, it isn’t perfect, but I’m pleased now with the result.

And as for what the lady did with all the hankies I sold her?? Used them for dust rags! Can you imagine?? Horrors! My beautiful vintage hankies!

Filed Under: DIYs to Sell Tagged With: displaying vintage hankies, preserving vintage hankies, repurposing vintage hankies, using a vintage hankie in a wedding bouquet, vintage hankie banner, vintage hankie in a glass frame, vintage hankies as wearable art

Shabby Chic Makeover of a Hollywood Regency Trash Can Cover

February 25, 2017 by Florence 48 Comments


I Wondered Why I Bought This Piece of Junk-

Shabby chic makeover of a Hollywood Regency trash can cover should have you wondering. I bought this piece of vintage Hollywood Regency junk at a thrift store. It was one of those dry days when I couldn’t find a darn thing, and it’s been sitting in the basement staring at me ever since. I don’t often see vintage Hollywood Regency trash can covers. Personally, I don’t see the point of it. My practical side says, “let’s just have a trash can and be done with it.” Apparently these were the thing in the 50’s, so here we are with this.

shabby chic makeover of a hollywood regency trash can cover

And it was GROSS-

And if it looks grody, it was. Rusty and ugly. It was covering someone’s trash can—a large brown Tupperware canister without a lid. It looked so supremely UGLY, I wondered later why I bought it.

How could I give this an attractive makeover?

How about making it into a floor lamp? The cover could hold a light bulb and it would throw interesting patterns through the filigree sides. Nah, I ruled that out. Trash can covers have no top or bottom. It is open at both ends, so I would have to build a support for the light mechanism. Didn’t feel like doing that. Besides, I don’t need another floor lamp. I have about 4 in storage and 3-4 in use. My personal rule is whatever I make over has to be something I can use or resell in my Etsy shop, vintagesouthernpicks.etsy.com, since I don’t have a booth. What next?

Repainting? Obvious. Something to cover rust. White spray paint to the rescue. Etsy didn’t have anything like this for sale already. They were all gold.

A while back a friend was having a garage sale, and I bought all her spray paint cans. Mistake!!!

Duh Tip of the Day: Never buy spray paint cans from a yard sale, especially when you don’t know how old they are.

So four full paint cans later, I finally found one that would spray. All the others quit after very little spraying. Gripes me to throw away practically full cans of paint, but after a youtube video on how to unclog them, and attempting to blow them out with an air compressor, I knew what I had to do.

A coat of fresh white paint made a world of difference.

shabby chic makeover of a hollywood regency trash can cover

A vision started coming together. Decorate this baby with flowers! I know. Not exactly the hot farmhouse look, but I’m a shabby chic girl. Since I can’t even draw a stick figure, it would have to be an image transfer. Here’s a word about image transfers….

Image Transfer Method:

(or what the experts say to do)

(I’ve read lots of tutorials on how to do image transfers.) The recommendations:

  • Use a laser image.
  • Use Mod Podge Image Transfer Medium
  • Put a thick 1/16″ layer of transfer medium over the image to the point that you don’t see any of the colored image showing through
  • Place the image over the item
  • Wait 24 hours
  • Wet the image and start rubbing the paper off gently

My Image Transfer Method:

  • Find an inkjet image
  • Wait 12 hours before you try to do anything with the image. (If you don’t wait, the colors will bleed.)
  • Use regular Mod Podge
  • Put a layer over the image. Don’t worry about a 1/16″ layer
  • Place the image over the item
  • Wait 24 hours
  • Wet the image and start rubbing the paper off gently

shabby chic makeover of a hollywood regency trash can cover

But remember the practical side? What do you DO with it??

It’s a vase! Ta-da! A vase cover actually. I just happened to have a tall glass vase that fit nicely inside of it, and it doesn’t show in the open bottom or top. The pretty paper covering the flowers looks nice lining the cover too.

shabby chic makeover of a hollywood regency trash can cover

Now I’m liking this! And my hubby loves it! A shabby chic makeover of a Hollywood Regency trash can cover sitting in a thrift store silverplate tray with a thrift store cherub and small thrift store birdcage in the background. So after we’ve enjoyed it for a while, into the Etsy shop it goes! What do y’all think?

Linking up to these fabulous parties~

Let’s Talk Vintage

Talk of the Town

Wonderful Wednesday

Dagmar’s Home

Vintage Charm

Share Your Style

Katherine’s Corner

Share Your Cup 

Waste Not Wednesday

Make it Pretty Monday

Sweet Inspiration

Friday’s Five Features

Craft Frenzy Friday

Snickerdoodle Make Bake Create

Moonlight and Mason Jars

Oh My Heartsie Girl Friday Features Linky Party


PLEASE PIN!

shabby chic makeover of a hollywood regency trash can cover

Filed Under: DIYs to Sell Tagged With: hollywood regency trash can cover, hollywood regency trash can cover makeover, image transfer methods, shabby chic makeover, trash can cover to vase

Daring Blue Table

June 25, 2016 by Florence 30 Comments

A daring blue table? Hang with me and I’ll tell you why. I bought this little side table for $5 about a year ago at a yard sale. Once I got out of the booth business, I didn’t plan on buying more furniture, but couldn’t resist such a good deal. I knew I could resell it at our church’s annual flea market.


Here is the before picture. It looks like only the top needs painting, but the paint on the bottom was slapped on, and it needed another coat. My perfectionist self wasn’t happy to leave as is.


daring blue table
Small Side Table


I decided on Annie Sloan’s Duck Egg Blue chalk paint for the top. I have a lot of that at the moment. My husband hates blue, so out of deference to his preferences, I haven’t used much of it. His previous wife loved blue, decorated with blue furniture, and painted with blue. Understandably, he’s been burned out on blue ever since. Feeling a little daring, I used it anyway since I’m not planning on keeping the table. Here is the finished result! I like its soft soothing tones.


daring blue table
Side Table Makeover


daring blue table
Blue Side Table

I forgot to take pictures of my two previous attempts to decorate the top using a real doily as the stencil. Unfortunately, it was a nondescript hot mess…too much bleeding and not enough definition.


I finally settled on using a stencil I got a while ago from Michael’s. I really liked the application of it in one corner. Sanding over the image a little, I waxed with Annie Sloan’s clear wax. A little distressing of the edges finished the project.


My inspiration for this came from Keri at Repurposing Junkie who shows how she utterly transforms these curbside finds.


daring blue table
Stencil detail


You can also see the carryover of blue in the legs.


daring blue table
Leg Details

As far as my husband goes, the daring blue table was a success.

Gary: “I really like that little table.”

Me: “Oh yeah? Thought you didn’t like blue. It’s blue.”

Gary: “Well, I like that blue.”

Me: (only thinking to myself) Well, you didn’t like it before.

Who knew?

I’ll tell about that “before” in another post.


Don’t Forget to pin!

Daring Blue Table


Filed Under: DIY Projects, DIYs to Sell Tagged With: annie sloan, blue table, chalk paint, clear wax, duck egg blue, side table, stencil

4 Little Makeovers

June 19, 2016 by Florence 12 Comments

4 little makeovers have been calling my name! Sorry for the bad light in the basement. I’m blessed to have a great place to work.

projects
4 Little Projects Needing Attention


*Green Adirondack chair for an American Girl doll

*Counter top spice rack

*Seagram’s glass liquor bottle

*White spice rack


The Adirondack chair is a curbside find. Missing an arm, but Gary, “the man who can fix anything,” was able to fashion an exact match! All it needed was paint.


I’ve had the counter top spice rack for sale on Etsy a while, & I admit, it looked dull, so paint here we come!


Liquor bottles are so pretty as a rule. Bought for $1 at a yard sale and repurposed with pretty decals, but still didn’t sell either in my booth or on Etsy. Let’s try paint!


And, the white spice rack…I picked this up at a thrift store for 79¢. It looked beat up, tired and sad, and definitely needed a makeover.


A friend of mine who runs a resale/junk shop says aqua is still trending. Unfortunately, my paint has turned to rubber. But I do have a full can of blue paint/primer. It will have to do.

Projects in Line
“Rubber” Aqua paint
Projects
Can of Blue Paint

I’ll mix in some Heirloom White. Perhaps I can get something close to aqua. I love chalk paint, but it is pricey.


Paint Mixing:

*I’ve tried simply pouring from can to can, but that is much too messy.

*I’ve tried spooning with a soup ladle, but decided against that, so

*I used the flat stir stick as a ladle…slow and messy too, but effective. You can’t get an accurate idea of your recipe though.


After mixing in a whole lot of white, the Adirondack chair shines in its new coat of “Beach Blue!” I even like it better than the original factory color. Of course, I’m not biased! But it’s SOLD! Keeping fingers crossed for the spice rack.

Projects
American Girl Adirondack chair
Projects
Bulky spice rack due for a paint job


Those look nice, don’t you think, Wes? Our buddy Wes, lives in the basement, and has one main interest….EATING! And he lets you know VERY LOUDLY when the bowl is almost empty.

Projects
Wes, the basement hermit


I painted the Seagram’s bottle with “Old White” chalk paint allowing it to dry between coats.

Then with fine sandpaper, I distressed to bring out the lovely details. Click here to see an attractive way to use this.

4 Little Makeovers
Seagram’s Bottle


I painted the spice rack in the last of my Old White. For interest, I spray painted the inside and sides of the drawers pink. Finding pretty “Floral Bunches” scrapbook paper on sale at Michael’s,

4 Little Makeovers
Spice Rack distressed
4 Little Makeovers
Scrapbook paper
4 little makeovers
Paper measured and readied for Modge Podge

I measured and cut the paper to fit the little drawer fronts. The trickiest part of this was fitting the paper around the knobs because I didn’t want to piece it.

Fitting the Paper Over the Knob:
  1. I cut the paper in the correct measurements.
  2. Then I placed it over the drawer front marking with pencil where the knob was located.
  3. I folded the paper in half without creasing it, and then cut a slit at the mark.
  4. I was then able to cut out a hole for the knob and fit the paper over it like pulling a shirt over your head.


Application with Mod Podge to the paper and the drawer front finished the job! It adds a sweet shabby chic touch, which I love. Just a little distressing and I’m done. Of all 4 little makeovers, I like this one the best.


**Please Pin!

4 Little Makeovers
Shabby Chic Spice Rack


Do you have a favorite? Please tell me about it in the comments!

Save

Save

Filed Under: DIY Projects, DIYs to Sell Tagged With: adirondack doll chair, american girl doll chair, beach blue paint, makeovers, old white paint, paint and distress, scrapbook paper, seagrams bottle, shabby chic, spice rack, whiskey bottle

  • « Previous Page
  • 1
  • 2
  • 3
  • Next Page »

I’ve Been Featured…

ive-been-featured-link-party-buttons
oh-my-heartsie-girl-wonderful-wednesday-button
snickerdoodle-button

Beezer…Over the Rainbow Bridge 2017

Vintage Southern Picks on Etsy

Vintage Southern Picks on Etsy

Everything Square Dance & Western on Etsy

Everything Square Dance & Western on Etsy

© 2017 Vintage Southern Picks | All Rights Reserved

Disclosure: Some of the links on this website may be affiliate links. When you make a purchase from these links, I earn a small commission.