
I enjoyed creating these DIY tabletop Christmas trees using vintage tart tins and icing cones. I had everything on hand, and most of what I used came from past estate sales. I saw the tart tins and icing cones in my stash one day many months ago, and thought what cute mini Christmas trees they would make with just a little modification, and hubby’s help.
My Beautiful Mini Tabletop Trees

The Supplies
Of course, I forgot to get a photo of the tart tins and icing cones before I started, but here’s the rest of the supplies I used:
- binder twine
- red and green glitter
- 2 paper napkin designs
- pinwheel beads

Basic Construction
I commissioned hubby to put the trees together for me. He soldered wire to the tart tins, which went up through the holes in the narrow end of the icing cones, leaving about 1-1/2″ of wire extending from the top. It wasn’t at all flexible, so I studied how to decorate it. I found the pinwheel beads at a recent estate sale. Luckily they fit over the wire, and provided nice color.

Decoupage Method
The icing cones easily took napkin decoupage using the accepted method:
- separating a 3-ply napkin into the final one-ply with the design
- Matte Mod Podge applied to icing cones first
- Then the paper napkin was applied to that
- As many of us know, it doesn’t work well to apply Mod Podge to the napkin, which too easily tears it.
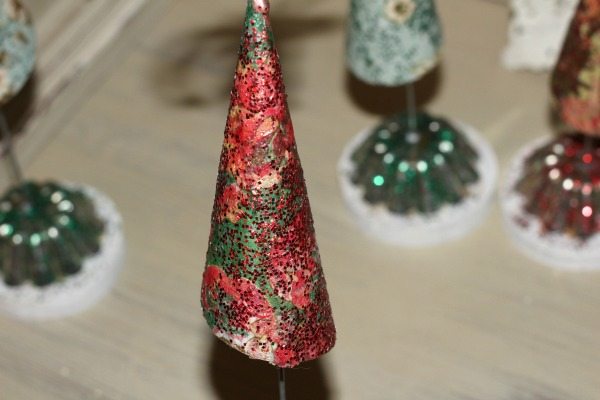
I was pleased with how it looked, but a little glitter makes everything look more festive! And I took it a step further to glitter the tart tin bases.

But Wait…There’s More to the Story
Now you really don’t know the whole story here. These look perfect now with their round wooden bases. I found out the hard way that my trees needed wooden bases. They were a bit top heavy, even with the lightweight addition of the pinwheel beads. One day recently, the worst happened. One of my trees fell over on the floor, which was open season as far as my DAWG, Leo was concerned. Yes, our one-year old was about to get in on the act.

Here’s our “angel” with one of his favorite toys…a thrifted stuffed animal that he killed a while back. I should mention that he has a basket FULL of toys, but no, he wants whatever I’ve got, whatever I’m working on. Hubby found him with my treasured tart tin mini Christmas tree on the floor that he was about to kill. Horrors!
Last Step
This is when we realized the trees needed bases. Tragedy avoided.
Here’s a final look at my beloved trees. I really like how they turned out.

You don’t want to miss the rest…
And now, before you go, why not check out the inspired creations by my talented blogging buddies from the “Blogging 50” Facebook group? Yep, we’re living proof that it’s not just the young bloggers who have it all together! We’re an all female group of…ahem…mature….ladies, who have great ideas and lots of wisdom.


Sharing with these Link Parties….
Florence
Latest posts by Florence (see all)
- The Latest Vintage Hauls - February 10, 2020
- A Vintage Fall Haul - November 3, 2019
- September Sales on Etsy and My New Antique Booth - September 30, 2019
- Camping Trip Thrift Store Haul - August 2, 2019
These are ADORABLE!! I love using napkins/Mod Podge for decorating – always on the hunt for pretty ones to use for projects. I’ve never seen the decorating tubes but will be keeping an eye for them now for sure.
Thanks Lauren! I had fun with this one!
These are Adorable Florence! I love how you put them all together with the cones wrapped with the pretty napkins, and the tins for the base. I’m glad that the hubby was there to save your tree from a killing, lol. And able to fix them so no more toppling over.
Yes, hubby to the rescue!! Thanks for the kind words too. I enjoyed making these pretty!
Oh Florence these are adorable! And your story is too funny! I’ve never even heard of icing cups – learn something every day:) Great repurposed Christmas craft. xo Kathleen|Our Hopeful Home
Thanks Kathleen! Appreciate your comment!
Very cute! That dog of you is a ham! He is a sweetie. I love labs! Have a great Thanksgiving and make sure Leo does not eat the Turkey!
Maria
Thanks Maria! Leo is just Leo. He’s a sweet baby & a ham for sure! Hope you have a happy Thanksgiving too! Thanks for coming by to comment!
Love your trees Florence! Great idea using the icing cones. I’m so glad your tree was saved. Pinned!
Thanks Tuula! Loved your angels too, although I haven’t had a chance yet today to read very many of the awesome posts. I’ll be coming though. I saw yours on FB. Thanks for pinning!
Those are just the cutest trees I’ve ever seen!
Tania
Thanks Tania!
Oh dear Leo, what are you doing with Mommy’s stuff? 😀 It doesn’t look like he damaged anything though. Maybe he was just trying to check if they were stable and would last a lifetime? They look lovely too Florence and it’s such a neat idea.
No we rescued before he could bend it beyond recognition. He loves to chew. Thanks for the kind words!
Florence these are so adorable. They look as if they came out of a Dr. Seuss book. And you cannot blame Leo for wanting a piece of the action! 😉
Thanks Mary. I guess they do look similar to Dr. Seuss. I hadn’t thought of that! Oh yes, Leo…such a trial he is. Always wanting to play & chase our cats.
So sweet! You always say that you’re not crafty Florence, but I’ve seen some very creative pretties on your site. Including this one! Happy Thanksgiving!
Thank you Kim! I appreciate that! Hope you have a wonderful Thanksgiving as well.
Hi Florence,
I’m a modge podge lover too and your Christmas trees turned out adorable. I’m really enjoying looking through your posts. Your creativity is fabulous!
Wishing you a lovely Thanksgiving,
Jemma
Thank you Jemma! Appreciate your sweet comment!
These are so cute Florence, and I love how you found a new use for the tart tins and icing cones.
Thanks Kristi! Appreciate you dropping by!
Florence, these trees are so cute…I love them! This is such a creative project…I enjoyed visiting with you. Happy Thanksgiving!
Thank you so much Pam! Hope you had a wonderful Thanksgiving!
How adorable. Leo helped you realize you need a base, LoL. He’s a cutie pie and so are the trees.
Thanks Debra…I guess Leo did…haha
Thanks so much for visiting!! I have found a place in my Living Room where I will be displaying my vintage pop up card. These are adorable!! Thanks for sharing!!
Hugs,
Debbie
Thank you Debbie! I appreciate your comment!
Love your little trees – very cute!
Thanks so much Carol!
How creative & super fun! Love how colorful & festive too. And most important your beautiful fur-baby 😉
visiting from blogging50 😉
Thank you Randi! Tomorrow’s the day for my first bark!
These are so stink’n cute Florence – thank goodness the fallen one was caught before it was devoured! Pinned
Thanks Marie!
Florence, your Christmas trees are lovely! That’s too funny that Leo wants whatever you have regardless of his toys. I’m glad you found the wooden base solution for your trees.
Thanks Keri!!
Cute, cute, cuter!! So, the icing things are tin? (Or aluminum?) When you mentioned them in the other post, I thought they were going to be the plastic tubes. Which would be cute as well. They’d have to be stuffed but would be lighter weight. Maybe even too light. And I’m not sure how to attach the wire inside…. Hmmm…. Maybe a thought for next year. Definitely want to do one of the versions next year! I’m a-pinnin’. 🙂
Yes they are tin. Hubby did the wire part…said he used “ceiling wire.” They threaded through the hole in the end of the tin. Thanks for pinning!
Very festive! Love the napkin idea… thanks so much for sharing and also for visiting my blog! Enjoy the holidays!
Thank you Jill! Happy Holidays to you!
These are just adorable! I love old tin and love finding ways of using it and displaying it. Cute upcycle! Pinned 🙂
Thank you Wendi! I appreciate you dropping by!