• Home
  • About
    • About Me
    • Contact Me
  • Etsy Shop
  • Link Parties/Featured
    • I’ve Been Featured
    • Sweet Inspiration Link Party
  • Personal Diary

Vintage Southern Picks

Cheapskate Picker Sharing Finds, DIY & Selling Tips

Facebook   Twitter   Pinterest   Google+   RSS
  • DIY Projects
    • DIYs to Sell
    • Holiday/Seasonal
    • Home and Garden DIY
  • Home and Garden
    • Home Organization
    • How I Organize My Ebay/Etsy Home Office
    • Home Tours
    • Party Games
  • Selling Tips
    • Buys I Avoid
    • Shipping
    • What’s Selling on Etsy/Ebay
    • Yard Sales
      • How to Give a Yard Sale
      • What Not to Say in Yard Sale Ads
      • Yard Sale Humor
  • Vintage Finds
    • Thrift Store Finds
    • Mystery Items
    • Yard/Estate Sale Finds
    • Vintage Junk Giveaways
  • Disclosure Policy
  • Privacy Policy

When Hickory Nuts Fall

September 4, 2016 by Florence 33 Comments

When hickory nuts fall, Autumn has arrived! At least in my neck of the woods. Our hickory trees drop their nuts thickly. We gather the nuts in buckets and throw them away so they don’t trip us up, interfere with lawn mowing, or take root. The nut in the photo is still a little immature because I cheated and pulled it off the tree. This is sorta the way I feel about Fall too. Summer is waning, but not quite gone. I’m anticipating Fall, but it’s not ready to arrive yet. And the leaves won’t be fully off the trees until after Thanksgiving.

when hickory nuts fall
The Lowly Hickory Nut


Here’s my last Summer arrangement that I can’t bear to break down yet~


when hickory nuts fall
The Last of Summer


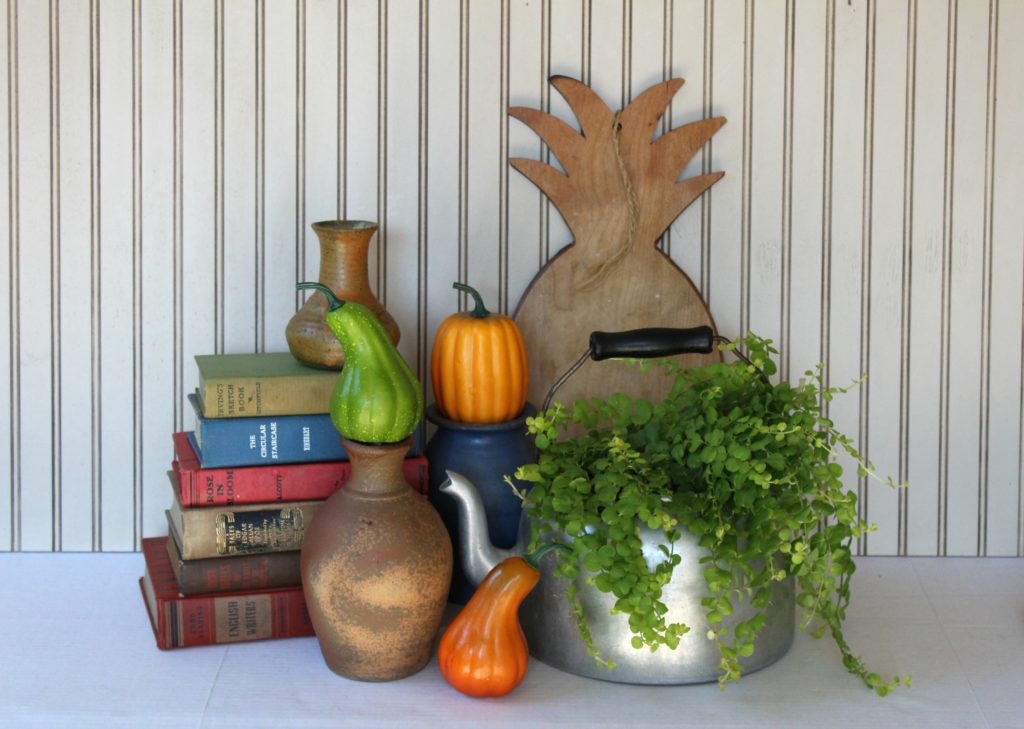
So I’m finally into a little Fall decorating around here. I’ve seen so many of your lovely Fall porches that I got inspired and created a few looks of my own.


The pineapple cutting board is one of many I have, but don’t use anymore. The pottery vases I’ve had a long time and enjoy decorating with when they aren’t buried under a ton of yard sale stuff waiting to be listed. The books I got at an estate sale, and the old farmhouse kettle was gathering dust on top of my kitchen cabinets. The gourds and pumpkin are realistic specimens from Dollar Tree. The plant is real and called “Creeping Jenny.”


when hickory nuts fall
Fall Vignette


Here’s my Fall porch decor~


The wooden wheelbarrow was gathering dust and cobwebs in the garage. I bought it at a yard sale a good while back, and it suffered from dirt and a broken wheel. Thanks to hubby’s expertise, he did a few repairs, and it’s as good as new. I’ve had the shutter a while and brought it out after slapping some paint on it. I just bought the watering can at an estate sale this weekend…more on that in another post. I was ready for some white mums, and there you have it…just a simple arrangement.


when hickory nuts fall
Simple Fall Arrangement


Do you like it? Happy Labor Day Weekend everyone!


PLEASE PIN OR SHARE!

when hickory nuts fall

Filed Under: Holiday/Seasonal Tagged With: autumn decor, creeping jenny, end of summer, fall arrangement, fall decor, fall decorating, fall mums, hickory nut, summer arrangement

6 Steps for Laying Tile When You’re Clueless

July 31, 2016 by Florence 12 Comments

This post covers 6 steps for laying tile when you’re clueless, but I gotta “lay” some background.


Gary and I always yard sale together…that’s what happens when your man is retired. He’s not a junker…he likes to explore, and enjoys the aesthetics of people’s houses.


Us at estate sales:

Gary: Did you see those kitchen cabinets?

Me: Huh?

Gary: Did you see the pretty paneling and how the kitchen cabinets were laid out? I really liked that bedroom paint color. Did you see that old bathroom? Did you see the 40’s tile? Did you notice the layout of the house? Did you see the back patio and the porch?

Me: Whaaat??? Uh no, I don’t see any of that. I’m only looking at STUFF!


But I digress….so when we happened upon this UGLY motel nightstand, I didn’t give it a second glance. I had a booth back then too, but I sure didn’t catch a vision for it. Gary stopped me, commenting that it had possibilities. I grunted disparagingly, but it was only $5, and bargains give me pause.


Wish I had a picture to show you how truly tacky it was. Painted silver, it looked like something a college student had slapped on, and the only redeeming factor was the mirrored drawer. Someone had glued on little silver charms, making it sparkly and eye-catching. Later I discovered the charms disguised a cracked mirror. There was no way this was gonna fly. The mirror had to go. The silver definitely had to go.


6 steps for laying tile when you're clueless
This is the after


I painted it Sherwin Williams “Heirloom White,” which was my “go to” paint. That definitely improved it. I removed all the little charms, saving them for future use, then chipped away until all the mirror pieces were off.  But how to fix the drawer front?


I decided to try tiling it. Had I ever tiled? NO! But I discovered Youtube was my best friend. I just happened to have some bits of tile on hand because you know us yard salers always have stuff in case we need it.


6 STEPS FOR LAYING TILE WHEN YOU’RE CLUELESS


SUPPLIES:


Tile (ya think?)

Where to Find Tile for Free:  Salvage stores always have broken tile, which they throw away. Probably tile retailers will give it to you, but I haven’t had to go there yet.


Tile cutter

6 steps for laying tile when you're clueless
Tile Cutter

(yes you can take tile outside and hit it with a hammer, and believe me, I considered it because “Cheapskate Southern Girl Picker” HATES to spend money buying supplies, and hates even worse driving through congested traffic to buy supplies!)


But I discarded that notion because I wanted control over how big my pieces were, and I didn’t want to crack my concrete.


Tile Adhesive

6 steps for laying tile when you're clueless
Tile Adhesive


Non-Sanded Tile Grout

6 steps for laying tile when you're clueless
Grouts


See the cat? “Wes” just loves to have his picture taken.

I don’t have a clue why you use “non-sanded grout” rather than “sanded grout,” but that’s what youtube said to get, so I got it.


Grout Spreader/Putty Knife

6 steps for laying tile when you're clueless
Putty Knife


 TILING PROCEDURE:


*The hardest part for me was the design because my mind goes on vacation where design and styling are concerned. I played with my tile bits and came up with this.


6 steps for laying tile when you're clueless
Drawer Front


“Butter” the tile bits with the adhesive, and place them into your design area.

*After you have them placed, let it cure for 24 hrs.

**The important thing is to have your tile pieces the same thickness so that when placed, everything is even and at the same level. Perhaps you can see below that all the pieces are about the same height.


6 steps for laying tile when you're clueless
Another tile project


*Mix up grout. Take as much powdered grout as you think you’ll need, mix with water so that it is the consistency of cake batter, and start spreading between the tile with the putty knife. **A little grout goes a long way, so don’t go overboard mixing it up. I had to throw a bunch away.

*After everything is spread and filled in properly including the edges, wipe down the surface with a damp rag to remove the grout residue.

*Dry for 24 hrs. You are done!

I went an extra step and covered the bottom of the drawer with Dollar Store contact paper, and now we love our UGLY motel nightstand makeover!


6 steps for laying tile when you're clueless
Dollar Store Contact Paper Drawer Lining


We liked it so much, we decided to keep it!

Let me know what you think!


PLEASE PIN!

6 steps for laying tile when you're clueless

Filed Under: Home and Garden DIY Tagged With: decorative tiling, heirloom white, laying tile, motel nightstand, nightstand makeover, sherwin williams, small tile jobs, tile adhesive, tile cutter, tile grout, tiling supplies

Daring Blue Table

June 25, 2016 by Florence 30 Comments

A daring blue table? Hang with me and I’ll tell you why. I bought this little side table for $5 about a year ago at a yard sale. Once I got out of the booth business, I didn’t plan on buying more furniture, but couldn’t resist such a good deal. I knew I could resell it at our church’s annual flea market.


Here is the before picture. It looks like only the top needs painting, but the paint on the bottom was slapped on, and it needed another coat. My perfectionist self wasn’t happy to leave as is.


daring blue table
Small Side Table


I decided on Annie Sloan’s Duck Egg Blue chalk paint for the top. I have a lot of that at the moment. My husband hates blue, so out of deference to his preferences, I haven’t used much of it. His previous wife loved blue, decorated with blue furniture, and painted with blue. Understandably, he’s been burned out on blue ever since. Feeling a little daring, I used it anyway since I’m not planning on keeping the table. Here is the finished result! I like its soft soothing tones.


daring blue table
Side Table Makeover


daring blue table
Blue Side Table

I forgot to take pictures of my two previous attempts to decorate the top using a real doily as the stencil. Unfortunately, it was a nondescript hot mess…too much bleeding and not enough definition.


I finally settled on using a stencil I got a while ago from Michael’s. I really liked the application of it in one corner. Sanding over the image a little, I waxed with Annie Sloan’s clear wax. A little distressing of the edges finished the project.


My inspiration for this came from Keri at Repurposing Junkie who shows how she utterly transforms these curbside finds.


daring blue table
Stencil detail


You can also see the carryover of blue in the legs.


daring blue table
Leg Details

As far as my husband goes, the daring blue table was a success.

Gary: “I really like that little table.”

Me: “Oh yeah? Thought you didn’t like blue. It’s blue.”

Gary: “Well, I like that blue.”

Me: (only thinking to myself) Well, you didn’t like it before.

Who knew?

I’ll tell about that “before” in another post.


Don’t Forget to pin!

Daring Blue Table


Filed Under: DIY Projects, DIYs to Sell Tagged With: annie sloan, blue table, chalk paint, clear wax, duck egg blue, side table, stencil

4 Little Makeovers

June 19, 2016 by Florence 12 Comments

4 little makeovers have been calling my name! Sorry for the bad light in the basement. I’m blessed to have a great place to work.

projects
4 Little Projects Needing Attention


*Green Adirondack chair for an American Girl doll

*Counter top spice rack

*Seagram’s glass liquor bottle

*White spice rack


The Adirondack chair is a curbside find. Missing an arm, but Gary, “the man who can fix anything,” was able to fashion an exact match! All it needed was paint.


I’ve had the counter top spice rack for sale on Etsy a while, & I admit, it looked dull, so paint here we come!


Liquor bottles are so pretty as a rule. Bought for $1 at a yard sale and repurposed with pretty decals, but still didn’t sell either in my booth or on Etsy. Let’s try paint!


And, the white spice rack…I picked this up at a thrift store for 79¢. It looked beat up, tired and sad, and definitely needed a makeover.


A friend of mine who runs a resale/junk shop says aqua is still trending. Unfortunately, my paint has turned to rubber. But I do have a full can of blue paint/primer. It will have to do.

Projects in Line
“Rubber” Aqua paint
Projects
Can of Blue Paint

I’ll mix in some Heirloom White. Perhaps I can get something close to aqua. I love chalk paint, but it is pricey.


Paint Mixing:

*I’ve tried simply pouring from can to can, but that is much too messy.

*I’ve tried spooning with a soup ladle, but decided against that, so

*I used the flat stir stick as a ladle…slow and messy too, but effective. You can’t get an accurate idea of your recipe though.


After mixing in a whole lot of white, the Adirondack chair shines in its new coat of “Beach Blue!” I even like it better than the original factory color. Of course, I’m not biased! But it’s SOLD! Keeping fingers crossed for the spice rack.

Projects
American Girl Adirondack chair
Projects
Bulky spice rack due for a paint job


Those look nice, don’t you think, Wes? Our buddy Wes, lives in the basement, and has one main interest….EATING! And he lets you know VERY LOUDLY when the bowl is almost empty.

Projects
Wes, the basement hermit


I painted the Seagram’s bottle with “Old White” chalk paint allowing it to dry between coats.

Then with fine sandpaper, I distressed to bring out the lovely details. Click here to see an attractive way to use this.

4 Little Makeovers
Seagram’s Bottle


I painted the spice rack in the last of my Old White. For interest, I spray painted the inside and sides of the drawers pink. Finding pretty “Floral Bunches” scrapbook paper on sale at Michael’s,

4 Little Makeovers
Spice Rack distressed
4 Little Makeovers
Scrapbook paper
4 little makeovers
Paper measured and readied for Modge Podge

I measured and cut the paper to fit the little drawer fronts. The trickiest part of this was fitting the paper around the knobs because I didn’t want to piece it.

Fitting the Paper Over the Knob:
  1. I cut the paper in the correct measurements.
  2. Then I placed it over the drawer front marking with pencil where the knob was located.
  3. I folded the paper in half without creasing it, and then cut a slit at the mark.
  4. I was then able to cut out a hole for the knob and fit the paper over it like pulling a shirt over your head.


Application with Mod Podge to the paper and the drawer front finished the job! It adds a sweet shabby chic touch, which I love. Just a little distressing and I’m done. Of all 4 little makeovers, I like this one the best.


**Please Pin!

4 Little Makeovers
Shabby Chic Spice Rack


Do you have a favorite? Please tell me about it in the comments!

Save

Save

Filed Under: DIY Projects, DIYs to Sell Tagged With: adirondack doll chair, american girl doll chair, beach blue paint, makeovers, old white paint, paint and distress, scrapbook paper, seagrams bottle, shabby chic, spice rack, whiskey bottle

7 Ways with Wildflowers

June 3, 2016 by Florence 8 Comments

I wanted to share 7 ways with wildflowers in “new” vintage vases that have caused me to break from tradition on bringing flowers inside. I usually prefer to enjoy them in their natural habitat, but I do enjoy them inside when we are going to have guests.


Everything you see here came from yard sales~

7 ways with wildflowers in vintage vases
Grouping of Glass
7 ways with wildflowers in vintage vases
Grouping in front of “Roman” tin picture
7 ways with wildflowers in vintage vases
Grouping on a Sideboard

Which one do you like best? I can’t decide…


I haven’t shown you the “Roman” picture officially yet, but you can see it down below. That’s coming in the next post. I bought the Hurricane Lantern at the Tiny Estate Sale without the globe or wick…I almost passed on it, but I’m glad I didn’t because it makes a wonderful vase, and when I get ready to make a lantern again, I have all the necessary pieces. The opening is large enough for adding marbles for color.


Picture $3. All the little vintage glass bottles $1. Hurricane lantern base $1. Tablerunner $1. White bottle $1.

7 ways with wildflowers in vintage vases
Grouping of Little Bottles
7 ways with wildflowers in Vintage Vases
Seagram’s Whisky Bottle Vase
7 ways with wildflowers in Vintage Vases
Whisky bottles are often quite pretty in design, aren’t they? I bought this for $1, painted and distressed it.


When I have my supper club over, I like to decorate with small bottles and little vases so we can see over them to talk. They add a sweet touch to a table.


Here is another arrangement I like which can also be used on a table…

7 Ways with Wildflowers in Vintage Vases
The little glass bottles fit nicely in the spice rack.


All the little bottles fit nicely into a wooden spice rack, which I painted with my own mix…what I call “Beach Blue,” which I created by mixing white with bright blue.


The spice rack had been in my Etsy shop for 4 months like this…

7 ways with wildflowers in vintage vases
The dull brown spice rack


If it doesn’t sell in that length of time, it usually gets a makeover, if possible. Do you like the change? I certainly do! Let’s hope it sells with its new look!


7 Ways with Wildflowers~

  1. Flowers in 4 or more little vintage glass bottles
  2. Flowers in a painted and distressed Seagrams Whisky Bottle or any other decorative bottle
  3. Flowers in front of a dark background like the tin picture to highlight the grouping
  4. Flowers in front of a mirror to reflect the grouping
  5. Flowers in a vintage hurricane lantern
  6. Flower vases in a wooden box like the spice rack or any other wooden box.
  7. Flowers in short vases on top of a colorful tablecloth and placed along the length of a table. If you had enough vases, you could also place one in front of each place setting for each guest to enjoy. I’ve always wanted to do this, but never had enough small vases.


The Wildflowers~


Let’s talk about the wildflowers! These are some of my favorites in arrangements because they last several days. Everything I know about gardening I learned from my mother who learned it from her mother.


The white flowers are Yarrow. I just discovered a pin by Amy at Tenth Acre Farm with some interesting info about Yarrow.


The pink daisy-like flowers with big centers are Pink Cone Flowers of the Rudbeckia family. Black-Eyed Susans (another personal favorite) are also in this family, but aren’t blooming down here yet.


The other reddish flower with a tubular bloom is a Dutch bulb which grows all over the place in my yard (Zone 7). It’s quite pretty, makes a nice cut flower, grows so well and spreads, that my hubby is trying to get rid of it. It’s a losing battle because I like it! Of course, I can’t remember the name of it.


I have seen so many creative uses for flowers on my favorite blogs. I would love to hear your ideas!


Filed Under: Home and Garden DIY Tagged With: painted distressed bottle, repurposed spice rack, using a hurricane lantern as a vase, using a whiskey bottle as a vase, using unusual bottles for vases, vintage bottles as vases, vintage vases, wildflower arrangements, yard sale finds

  • « Previous Page
  • 1
  • …
  • 6
  • 7
  • 8
  • 9
  • Next Page »

I’ve Been Featured…

ive-been-featured-link-party-buttons
oh-my-heartsie-girl-wonderful-wednesday-button
snickerdoodle-button

Beezer…Over the Rainbow Bridge 2017

Vintage Southern Picks on Etsy

Vintage Southern Picks on Etsy

Everything Square Dance & Western on Etsy

Everything Square Dance & Western on Etsy

© 2017 Vintage Southern Picks | All Rights Reserved

Disclosure: Some of the links on this website may be affiliate links. When you make a purchase from these links, I earn a small commission.