
Would you like to know about the vintage pick that became a DIY headache? I’m depending on YOU to tell me if it’s a happy ending! Final reveal at the end!
A year ago I attended an estate sale in a historic part of town. One of my most memorable finds was this….

…a vintage gold Elgin American Beauty compact carry-all dating from the 50’s-60’s. Bought for $5. Sold in my Etsy shop for $125! This was such a pretty piece in wonderful condition! (I had to get the estate sale person to show me how to open it.)
Finding the Homemade Tool Chest
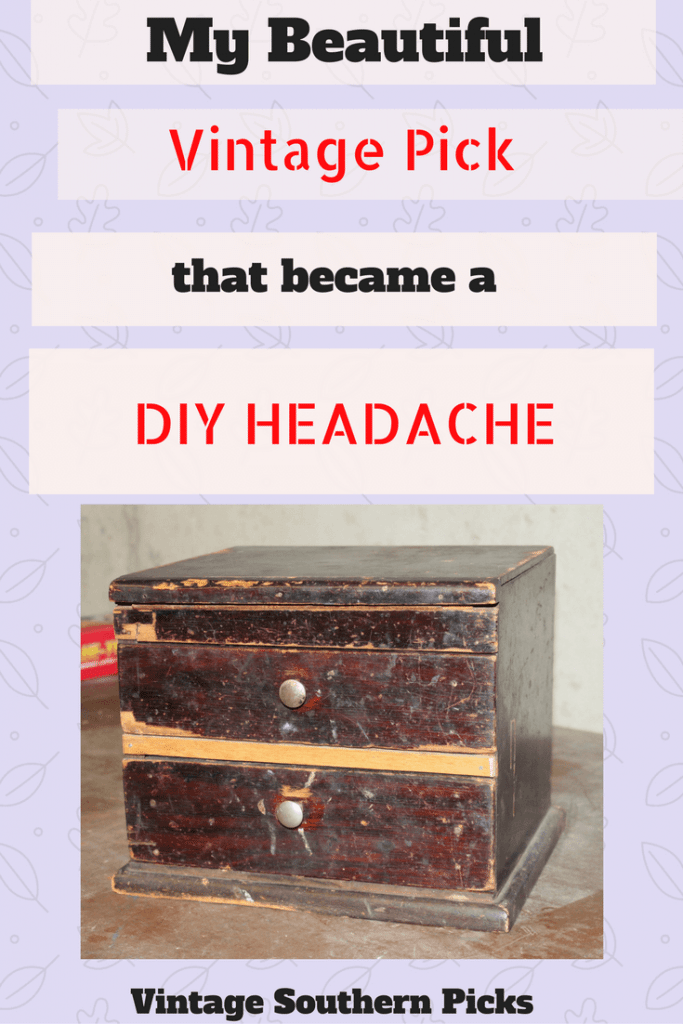
But the real find of the day….my absolute favorite….was this! It looks rough, I know. A homemade tool chest & dirty. At the sale it was sitting on the floor & loaded with screws, bolts, and the like. Isn’t it cute though? I fell in LOVE!

It had great bones, and when I saw that the top lifted up, I was sold. Paid $5 for the chest & all contents.

And the inside of the drawers was very primitive.

Transforming the Homemade Tool Chest
It sat in the basement for a year.
When I finally got around to working on it, I removed knobs and gave it a good sanding.
I couldn’t wait to put on the first coat of paint! Annie Sloan “Old White.”
To my chagrin & horror, the next day it was PINK! Oh well, “it just needs another coat of paint,” I told myself.
More paint applied. Pink again the next day.
More paint….still pink.
More paint…pink.
More paint….pink.
MORE….p..p..p..p..pink!
Okay. “What we need is some stain-blocker paint,” I told myself confidently. Ah! Found some oil-based in the basement. How old was it???Who knows! Who cares? Slapped that on….WHAT??? STILL PINK!!!???
Well, it just needs another coat of Annie Sloan! Putting any kind of paint on top of oil-based….not a good idea. I knew better, but I was getting slightly desperate.
The results? P-I-N-K!!!
Resignedly, I dragged to Home Depot. Dreading buying a whole gallon of stain blocker paint, I was delighted to find a quart of Zinsser Gray Stain-Blocker Oops paint. “Great! We got it licked now!”
Do I even have to tell you??? P…I…N…K.

So how come this works on all the other dark stained wooden items I’ve got???
This calls for another coat of Annie Sloan….Nope…..Pink.
I was beginning to despair. I was beginning to wish I’d never laid eyes on this !@#$%&* chest. Fickle me. I had fallen out of love.
I considered covering everything with decoupage. Nope. Didn’t want to do that either.
I considered painting it pink.
I considered painting it black.
I considered chunking it.
no, No, NO! I will NOT give up!
Okay. When all else fails, ask Google. Google suggests shellac. Noooooo! I don’t want to strip this down to bare wood!!!!! It’s got at least 10 coats of paint on it! But I found a suggestion for shellac that works OVER paint. And we just happened to have some!
Slap that stuff on & wait for the miracle of no-bleed-through. Right? Uh…not exactly. I used only 1 coat. Should have used 2, but it WAS much better.
So I felt I could FINALLY progress with this project, instead of endlessly slapping paint on it day after day. I was making a career out of painting this and getting nowhere!

I planned to do some decoupage all along. Decisions, decisions about what kind and the design.
The Transforming Plan:
Napkin decoupage to the drawer fronts
Paper decoupage to drawer sides
Paper decoupage to drawer bottoms
New Knob for top
New Knobs on drawers
Stencil of some kind
Bottom napkin won out for drawer fronts~

Found paper that looked like old letters~just sand the corners back a bit so it looks worn. Apply “Walnut Ink Antiquing Solution” to give it some age~

Can’t make a choice, so mix n match papers on the insides of drawers~

I found a French stencil I liked on Amazon, and applied it to the top.

Also stenciled under the top lid.

And made a trip to Hobby Lobby for knobs. Found 4 other knobs in my stash to use for legs. I can’t decide whether I like it with legs or not. What do you think?
Final result!!

And here’s the back….
Those 4 holes were there originally. The only thing I can think of is to cover these with buttons. Do y’all have any other ideas?

Is the pink gone? NO! You can see it up on the top edges in this photo. I can also see it just under the paint in various places. Uh oh, I might have to take up that career again. But at this point in time, I probably won’t do anything. Maybe later.
What do you think of the DIY Headache????
Sharing with these link parties here~
Florence
Latest posts by Florence (see all)
- The Latest Vintage Hauls - February 10, 2020
- A Vintage Fall Haul - November 3, 2019
- September Sales on Etsy and My New Antique Booth - September 30, 2019
- Camping Trip Thrift Store Haul - August 2, 2019
Wow!!! That WAS a headache! I have had bleed through before but not that bad! It turned out beautiful though, I love the papers you chose for the decoupage. I say just leave the holes, it is the back after all!
Tania
Thank you Tania! Appreciate your kind comments & suggestion on the back.
Florence, this is a beauty! I’ve done so little of this sort of thing and so long ago that I had no idea such “headaches” existed! (I’d just leave those holes as they are.)
Thank you so much Jean! Appreciate your sweet words! Yes, it has been a headache!!
Wow – that was a lot of work. I like the napkins on the front.
I’d leave the holes – gives it character!
Thank you Kim! Thanks for the suggestion on the holes too.
I admire your tenacity! I’d have given up after the first try. Or, would probably never have even started, knowing me. But the end result is really pretty. I do love it. I like the little feet, too. I think I’d just leave the holes, but obviously, I’m kinda lazy. But being the back, I don’t think I’d worry about it.
(Good for you on the compact!!! That’s great!)
Thanks Wanda! Glad I’m not the only one who felt like giving up! Thanks for the suggestions about the holes & feet. I guess I’ve grown to like them better.
Adorable and inspiring! I have a little two-drawer bin that will now be getting a similar treatment. I was stumped, but I like your ideas and plan to apply them (with the exception of the “new career”, lol). I think that bit of pink tone peeking out adds to the character. Well done!
Thanks Essie! I’m so glad I’ve inspired you!! Just don’t take up that career!! Glad you like the pink. I’m going to have to get a new mindset about it.
It turned out beautifully. It’s a real charmer, but you are a better woman than I. I would’ve given up long before or I would’ve had a pink box!! 😉
Haha, I’m determined I’m going to conquer it!! Thanks for your comment Kim!
Your headache looks beautiful!!! Don’t do anything else to it!! Brush down and back away!!!! Now find a new project!!
I love reading about your adventures!!
Thanks Susan! Appreciate your encouragement!! Glad you’re enjoying the blog!
Florence — great save! I am still perplexed about what caused the pink over and over again. Was it in the type of wood? What was the type of wood? The finished product is lovely — and you are right — it had great bones. I personally would leave the mystery holes in the back as I think it gives it character and makes you wonder about the story that goes with them. Also — I think I like it better without the feet, but that is just me… Great job Missy!
It’s an old stain which is what’s causing it to keep bleeding. Stains used in the 20’s-30’s cause a great amount of bleed. I’ve seen it happen before. I don’t know what type of wood it is….probably pine, but it’s the old stain. Thank you for the kind words though! I know what you mean about the feet. I think I liked them better without them too, but I’ve grown used to them now.
Looks great! Don’t worry about the holes, they can be used to hang it on a wall.
Thank you Ellen! I’ll not worry about the holes. Frankly, I don’t feel like working on this anymore anyway.
PERFECT just as it is!! Nobody will see the holes in the back. I love the pink that barely shows thru and just adds to the character and its “age”. I also love the legs – they are a nice addition and lift if off the floor a little so it can be appreciated a lot more. I am 67; don’t get around that well due to balance and neuropathy, but I love to paint things and I have learned so much from the ladies with blogs and thank you so much you do to teach us old dogs, new tricks!
Thank you for that encouragement Carol! Glad you like the legs. I loved your comment!
Oh Wow! That was a headache! I think I would of given up, but I’m sure glad that you didn’t. It turned out beautiful, new legs and All! Love it!!!
As for the hole, that’s the back so you probably could get away with leaving as is. Or maybe you could fill in with wood putty!
Thank you for the encouragement & kind words Linda! I’m thinking about leaving the back as is.
It is beautiful, I love the feet. Wondering how it would have looked painted pink (just feel like that’s the color it wanted to be). Wish I had your patience.
Believe me, I thought about that too, Robin! Painting it pink, I mean. I was determined i was going to win!
Oh wow, what a headache but it turned out beautiful! I love the feet, so cute!
Glad you like the feet! Thanks for the comment Sophie!
UGH I hate it when that happens, but you did a great job hiding that pesky pink bleed through. Kudos to you Florence for not giving up. It looks lovely now
Thank you Michelle! Appreciate the encouragement!
Florence everyone has at least one project from hell, and this one is yours. Although I have never been in such a situation I remember once Marie of Interior Frugalista had the same problem. Now she is a master at refinishing wood and her solution was the shellac. I tend to stay clear of anything that has a red undertone and so avoid the problem altogether. Despite all your problems, your little box turned into a knockout. I sincerely mean that. It has so much character and charm, I;m sure whoever chooses to buy it won’t notice the little pink that is left on. There is so much eye candy to look at.
Thank you so much Mary! I appreciate so much the encouragement! This box is now quite heavy. It would be expensive to ship. I was determined to keep going on it, but there were times I was ready to throw in the towel. This was definitely the project from hell!
PINK!!! I have a vintage dresser that did the same thing to me. I was trying to paint it white!!! And some point , after a few coats, it just had a soft glow…I went with it!!!
I like the feet.
I wonder if the holes were used for mounting it at one time?
It is really cute, good find!!
Thank you Margie! Next time you & I will both know to go with shellac. Glad you like the feet too. I don’t think the holes were for mounting. I think they were just in this piece of wood that was used on the back. The chest is pretty heavy.
What a charming box! I love it! -Marci @ Stone Cottage Adventures
Thanks Marci!! Thanks for dropping by.
So glad you kept at it because it turned out fabulous! I love it! xo Kathleen|Our Hopeful Home
Thank you Kathleen!
Florence, wow what a headache that must have been, but you know now the pink undertones coordinate with the green napkin drawer fronts. It looks beautiful!! I definitely say keep the knobs on the bottom, I like the height you added by using them, just my opinion though. As far as the holes in the back, buttons would be a great way to cover them. Its a cute box and i love what you did with it, just sorry you he to go through so much trouble for it.
Oh well, that’s the way it goes with some of the projects we encounter from time to time, right? I’m glad I finally got through with it! It was definitely a challenge! Thanks for the kind words & encouragement Keri!
Oh, my goodness. I feel your pain. But, the finished product is really beautiful. Kudos to you for your perseverance. And, thanks for the tip about the goes-over-paint shellac.
You’re welcome Carol! Learned the hard way, I can tell ya! Thanks for the sweet words.
lol… so sorry it happened but it makes a great story! The finished piece is BEAUTIFUL!!!
Thank you Ann! I appreciate your stopping by to comment & thanks for the encouragement!!
Florence, you have my complete and total admiration. I would have chunked the project. You stuck with it and the little chest looks fantastic!
Thank you Stacey! Sometimes I think I was crazy, but glad I stuck with it too.
Beautiful result, Florence–boy it sure took a lot of perseverance 🙂 I love the papers you chose and the “feet.” I’d leave the holes; they don’t bother me. Thanks so much for linking up your crazy project with us at Vintage Charm–
Thank you Diana. Love when I get to participate in Vintage Charm!
I think this is an absolutely gorgeous piece! I love the blue decopage paper you chose for the outside of the drawers and I love the antique writing paper with the spray. Its so so pretty– just gorgeous!
Why thank you so much Gigi! Appreciate your kind and encouraging words!!!
Your determination to give the old chest a new look paid off. It’s lovely now. Thanks for sharing at Snickerdoodle. Pinning.
Thanks Beverly. I love being on Snickerdoodle. Appreciate your kind words too.
Popping back by to let you know that I’ll be featuring this at tomorrow’s Snickerdoodle Party as our Snickerdoodle Special Feature.
Wow, thank you so much! I’m absolutely thrilled!
Florence, after a lot of headaches (been there|done that) it turned out absolutely beautiful! I just love the papered decoupage – so pretty. I think the legs also add so much to this piece. Good ole shellac comes to the rescue every time. Psssst, I have a table on the workbench this very minute that I must’ve painted the top 30 times to get it right but that’s not why it’s back in the workshop…paint bleed…yup, peeking through the white…. after several months. Thank goodness it didn’t sell! I feel your pain and hopefully, unlike me, you don’t make the same mistake twice. Pinned 🙂
Thank you so much, Marie, for that advice. Noo, I won’t make the same mistake twice. I fear the bleed might break through this also. Glad to hear I’m not the only one to have had this level of headaches either. Thanks, I’m glad you like this. I’m going to remember in the future that shellac is my best friend…LOL. Thanks for pinning!
I understand what you went through. It has happened to me a few times. Now if I think I will have bleed through I don’t take a chance. I grab the primer. The box has such character and personality. All of your hard work has paid off, the chest looks great.
Oh so you don’t use shellac? Primer works? Thank you for the encouraging words Debra!
What a headacke, but it came out beautiful. Inviting you to post at http://www.fabifabu.com/2017/05/28/inspiration-galore-project-party from Sunday to Wednesday!
Thank you for the invitation! I entered.
Sorry to read about your headache, but I love the finished product! I actually like the feet, and think they give it a more feminine look, which matches your pretty paper.
I paint a lot of furniture, and I NEVER sand anything with red stain if I’m using a light color. I think it just releases the tanins even more. A good cleaning with TSP Supstitute or a liquid sander and then a coat or two of shellac is the way to go. It’s also great for covering knots, which can bleed thru years later.
Thanks for sharing. Take care!
Love your suggestions & ideas Cynthia! Wish I’d seen it before starting out, but this is advice I’ll remember & it makes perfect sense, especially the bit about sanding. I have other dark stain pieces to do, & I plan to stock up on shellac for the future!!!
Florence, despite this being a royal pain for you I love how it turned out!! I am so glad you stuck with it. The box was such a pretty find and looks just lovely now. Thanks so much for linking it up to the Inspiration Galore Project Party last week. You are one of my Features tomorrow over at http://www.recreateddesigns.com. Pinned and shared. Hope you are having a wonderful weekend!
Thank you Lisa! I”m thrilled to be featured!