• Home
  • About
    • About Me
    • Contact Me
  • Etsy Shop
  • Link Parties/Featured
    • I’ve Been Featured
    • Sweet Inspiration Link Party
  • Personal Diary

Vintage Southern Picks

Cheapskate Picker Sharing Finds, DIY & Selling Tips

Facebook   Twitter   Pinterest   Google+   RSS
  • DIY Projects
    • DIYs to Sell
    • Holiday/Seasonal
    • Home and Garden DIY
  • Home and Garden
    • Home Organization
    • How I Organize My Ebay/Etsy Home Office
    • Home Tours
    • Party Games
  • Selling Tips
    • Buys I Avoid
    • Shipping
    • What’s Selling on Etsy/Ebay
    • Yard Sales
      • How to Give a Yard Sale
      • What Not to Say in Yard Sale Ads
      • Yard Sale Humor
  • Vintage Finds
    • Thrift Store Finds
    • Mystery Items
    • Yard/Estate Sale Finds
    • Vintage Junk Giveaways
  • Disclosure Policy
  • Privacy Policy

Salvaging an Expensive Lampshade with Men’s Ties

January 8, 2017 by Florence 38 Comments

Salvaging an expensive lampshade with men’s ties, you say? Yes!

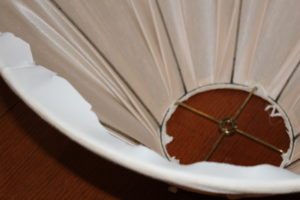
We bought this lamp from Ethan Allan about 20 years ago, and I remember sticker shock….$300! No more Ethan Allan for this cheapskate! You would hope a $300 lamp and lampshade would be something out of the ordinary and never deteriorate, but maybe I have my head in the sand. After 20 years of dust, the inner lining was in tatters, so I tore it off, but it needed trimming, which I got around to a year later. Yep, I’m pretty prompt.

salvaging an expensive lampshade with men's ties


salvaging an expensive lampshade with men's ties

Have you seen the lampshade repurposes on Pinterest, such as using doilies and lace, shredded fabric, or even sweaters? While I admire those looks, I’ve been dying to experiment with my stash of men’s ties. Two things I have a lot of are men’s ties and doilies, so using doilies was Plan B.

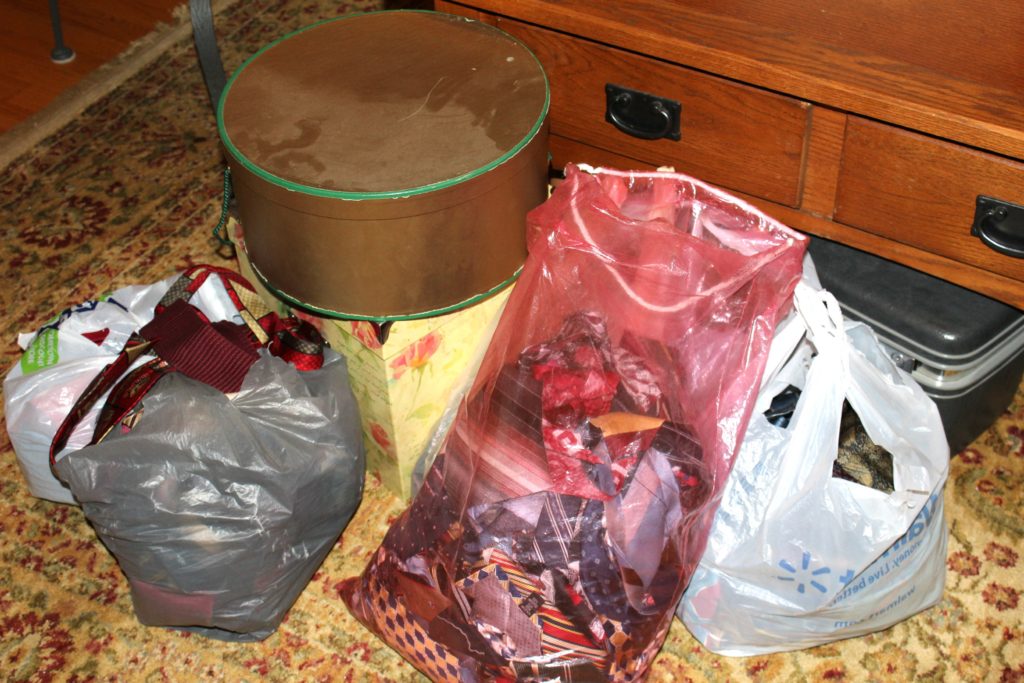
I have wide ties, narrow ties, knit and silk ties, ties in pieces, whole ties, pre-knotted ties…everything from Oscar de la Renta to Rush Limbaugh. Did you know there are Rush Limbaugh ties? Yes indeed!

Where can you find ties cheap? Thrift stores, yard sales, and sometimes estate sales. I got most of my stash from an antique shop going out of business. I’ve also put the word out at church that I’m collecting worn or stained ties.

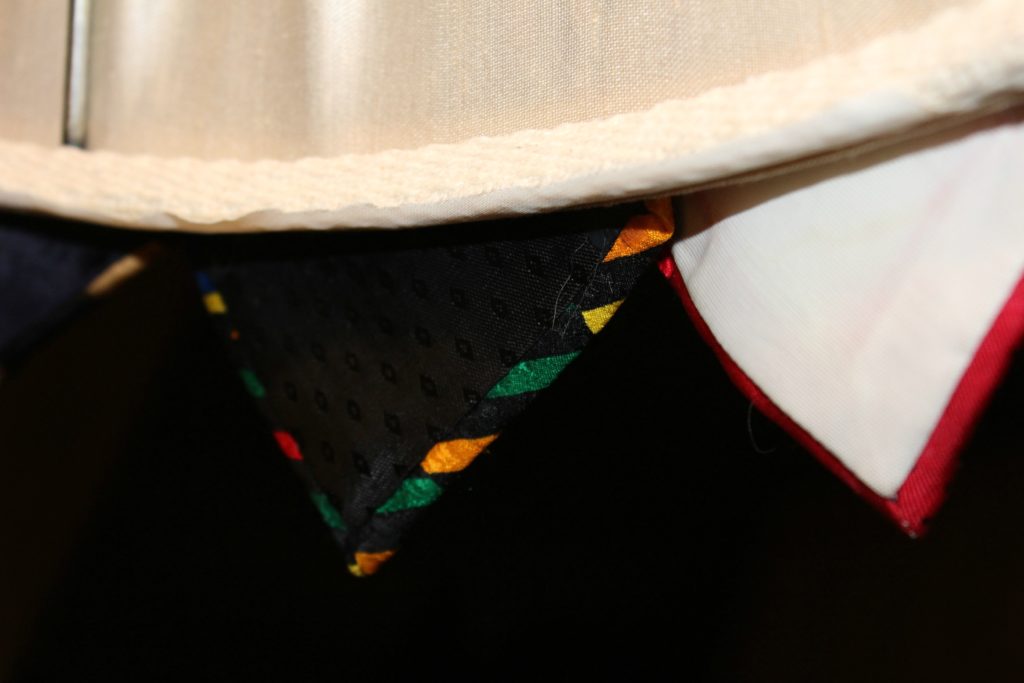
If you think about it, ties have fascinating textures, colors, and designs! In addition to the Rush Limbaugh tie, which is the loudest one on the shade, I found a King Tut tie. Somehow I don’t think Tut wore ties in his day! 🙂  Pinterest is a great place to get inspiration for tie projects. Check them out on my board!….Repurposing Using Men’s Ties. 

salvaging an expensive lampshade with men's ties
My entire tie stash

Having never done this before, I took my time, and if I do it again, maybe it won’t be an all day-er…LOL. I used 21 ties for this project, but it totally depends on how big the lampshade is. I tried not to obsess over being matchy-matchy. Ties close together aren’t going to match, but they can blend.

Salvaging an Expensive Lampshade with Men’s Ties

You may be surprised, but these are the only supplies other than ties and my sewing scissors. The brush is a stiff bristle I got from a yard sale. Probably any brush besides an artist’s brush would work. The idea is to apply a larger amount of glue than the little bead you get from squeezing the bottle.

salvaging an expensive lampshade with men's ties

I began by using fabric glue which is fine, but it was too dried out, so I switched to Elmer’s which is good for fabric as well as paper. Mod Podge would probably work too. That was Plan C. Hot glue is not a good idea. It hardens and makes cloth look lumpy, and can cause fabric to tear.

salvaging an expensive lampshade with men's ties
applying the glue to the tie

I dabbed the glue at the corners where the tie forms the bottom triangle. Placing the tie points at the bottom border of the lampshade covers it and gives a nice decorative edge, like so….

salvaging an expensive lampshade with men's ties

But I goofed in one spot. It’s not perfect.

salvaging an expensive lampshade with men's ties

Rather than placing ties side to side, I overlapped them a bit, which gives a nicer look

salvaging an expensive lampshade with men's ties

I did not do any measuring. I cut the ties off with sewing scissors roughly where I planned to glue them on the underside of the shade. Elmer’s worked fine for this too.

salvaging an expensive lampshade with men's ties
where the ties are glued down at top of shade

It looks a little messy here, but the bulk and color of the ties prevents this from showing. If I had it to do over, I would remove the inner white lining of the ties to lessen the bulk.

Here’s the finished result! I quite like it. A good thing about this is you can twirl the shade around to a different side when you are tired of one look. I love the pop of color between the two red recliners! What do you think?

salvaging an expensive lampshade with men's ties


salvaging an expensive lampshade with men's ties


Please pin or share!

salvaging an expensive lampshade with men's ties

Filed Under: Home and Garden DIY Tagged With: men's ties, new look for an old lampshade, recovering a lampshade, repurposing with men's ties

How to Make 50s DIY Rah Rahs

October 9, 2016 by Florence 34 Comments

This is such an easy project…how to make 50s DIY rah rahs, so called because cheerleaders wore them when I was in school. Also called saddle oxfords, which were popular shoe-wear in the 40s and 50’s, with another run in the late 60’s. Sixth grade along came penny loafers and I was dying to have a pair.


Unfortunately, I had to wear corrective shoes all through school. “I don’t care how much my feet hurt, Mama,” I begged, but she was heartless adamant. No penny loafers. Actually, the dreaded corrective shoes looked exactly like rah rahs, which I wore EVERY. SINGLE. DAY. of my life. Teased unmercifully about them for years, but back in style, girls wistfully asked where I got them! I couldn’t care less whether they were in style. I loathed them.


make 50s DIY rah rahs
Gettin’ the 50’s Look


Fast forward about 50 years, and now I wanted rah-rahs, to wear to a 50’s Square Dance, and disliking shopping, I hoped to forego the hunt for special shoes. Cheapskate me didn’t want to buy new shoes, or take the time to look for them. Surely there was a better way!


Remember how we all had to look the same in high school? I probably wouldn’t have been caught dead in these then…GASP! But with a little age and maturity, it doesn’t matter. (wink wink) Now you will be lauded for your cleverness! I always get compliments when I wear them. They could be used to complete a Halloween costume on a budget. Now these do look a little different on close inspection, but for me comfort won over style. As Mama used to say, “you can’t tell the difference on a galloping horse.”


make 50s diy rah rahs


Make 50’s DIY Rah Rahs


Materials: black felt, hole punch, scissors or pinking shears, hot glue.


*Find a cheap pair of white tennis shoes. Generic cheapies at Wal-Mart will do just fine.


*Sheets of black felt, which usually come in 8″ x 11″ sizes. 2-3 ought to do it.


*Hold up the felt to the side of your shoes, deciding how much of a black covering YOU want, cut to fit. I used pinking shears for cutting, which helped simulate the oxford look. Then a hole puncher to line up holes with your shoe laces. I also cut a strip for the back of heel area.


*Hot glue the felt onto your shoes.


How to make 50s DIY Rah Rahs
DIY Rah Rahs
How to make 50s diy rah rahs
Black Felt for Back

But how do you dance in these???


Good question because when dancing, it’s important to glide. Tennis shoes grip the floor, but I had a brilliant idea for that. Cut another piece of felt for the ball area of the bottom of your shoe. Glue that on & glide away!


TIP: The first time I tried the felt, I glued it to the entire bottom of the shoe…MISTAKE! When I stood up, I was like Bambi on ice!! Not a good idea.


make 50s diy rah rahs
You will glide on the floor


The felt on bottom of shoe lasts longer if you change into your shoes when you get inside rather than walking across a parking lot. I found the felt lasts through about 2-3 dances, then I have to glue more down. It’s a temporary fix, but it works!


I hate it, but my square dancing days are over. I encourage you to try it though! For us, it was one of the most fun activities around, …great for mind and body!


make 50s diy rah rahs
Mickey and Minnie Mouse Square Dancers


I can’t find my photo of us in 50’s attire, but here we are at a special square dance honoring Disney characters.


How about a Halloween costume? It looks close enough to how you see Mickey and Minnie Mouse dress!


PLEASE PIN OR SHARE!

make 50s diy rah rahs


Filed Under: Home and Garden DIY Tagged With: 50's attire, 50's costume for girls, 50's dance, 50's party, 50s shoes, 50s shoewear, dance shoes, halloween costume, homemade diy halloween costume, make rah rahs, rah rahs, repurpose tennis shoes into 50's shoes, saddle oxfords, square dance, square dancing

6 Steps for Laying Tile When You’re Clueless

July 31, 2016 by Florence 12 Comments

This post covers 6 steps for laying tile when you’re clueless, but I gotta “lay” some background.


Gary and I always yard sale together…that’s what happens when your man is retired. He’s not a junker…he likes to explore, and enjoys the aesthetics of people’s houses.


Us at estate sales:

Gary: Did you see those kitchen cabinets?

Me: Huh?

Gary: Did you see the pretty paneling and how the kitchen cabinets were laid out? I really liked that bedroom paint color. Did you see that old bathroom? Did you see the 40’s tile? Did you notice the layout of the house? Did you see the back patio and the porch?

Me: Whaaat??? Uh no, I don’t see any of that. I’m only looking at STUFF!


But I digress….so when we happened upon this UGLY motel nightstand, I didn’t give it a second glance. I had a booth back then too, but I sure didn’t catch a vision for it. Gary stopped me, commenting that it had possibilities. I grunted disparagingly, but it was only $5, and bargains give me pause.


Wish I had a picture to show you how truly tacky it was. Painted silver, it looked like something a college student had slapped on, and the only redeeming factor was the mirrored drawer. Someone had glued on little silver charms, making it sparkly and eye-catching. Later I discovered the charms disguised a cracked mirror. There was no way this was gonna fly. The mirror had to go. The silver definitely had to go.


6 steps for laying tile when you're clueless
This is the after


I painted it Sherwin Williams “Heirloom White,” which was my “go to” paint. That definitely improved it. I removed all the little charms, saving them for future use, then chipped away until all the mirror pieces were off.  But how to fix the drawer front?


I decided to try tiling it. Had I ever tiled? NO! But I discovered Youtube was my best friend. I just happened to have some bits of tile on hand because you know us yard salers always have stuff in case we need it.


6 STEPS FOR LAYING TILE WHEN YOU’RE CLUELESS


SUPPLIES:


Tile (ya think?)

Where to Find Tile for Free:  Salvage stores always have broken tile, which they throw away. Probably tile retailers will give it to you, but I haven’t had to go there yet.


Tile cutter

6 steps for laying tile when you're clueless
Tile Cutter

(yes you can take tile outside and hit it with a hammer, and believe me, I considered it because “Cheapskate Southern Girl Picker” HATES to spend money buying supplies, and hates even worse driving through congested traffic to buy supplies!)


But I discarded that notion because I wanted control over how big my pieces were, and I didn’t want to crack my concrete.


Tile Adhesive

6 steps for laying tile when you're clueless
Tile Adhesive


Non-Sanded Tile Grout

6 steps for laying tile when you're clueless
Grouts


See the cat? “Wes” just loves to have his picture taken.

I don’t have a clue why you use “non-sanded grout” rather than “sanded grout,” but that’s what youtube said to get, so I got it.


Grout Spreader/Putty Knife

6 steps for laying tile when you're clueless
Putty Knife


 TILING PROCEDURE:


*The hardest part for me was the design because my mind goes on vacation where design and styling are concerned. I played with my tile bits and came up with this.


6 steps for laying tile when you're clueless
Drawer Front


“Butter” the tile bits with the adhesive, and place them into your design area.

*After you have them placed, let it cure for 24 hrs.

**The important thing is to have your tile pieces the same thickness so that when placed, everything is even and at the same level. Perhaps you can see below that all the pieces are about the same height.


6 steps for laying tile when you're clueless
Another tile project


*Mix up grout. Take as much powdered grout as you think you’ll need, mix with water so that it is the consistency of cake batter, and start spreading between the tile with the putty knife. **A little grout goes a long way, so don’t go overboard mixing it up. I had to throw a bunch away.

*After everything is spread and filled in properly including the edges, wipe down the surface with a damp rag to remove the grout residue.

*Dry for 24 hrs. You are done!

I went an extra step and covered the bottom of the drawer with Dollar Store contact paper, and now we love our UGLY motel nightstand makeover!


6 steps for laying tile when you're clueless
Dollar Store Contact Paper Drawer Lining


We liked it so much, we decided to keep it!

Let me know what you think!


PLEASE PIN!

6 steps for laying tile when you're clueless

Filed Under: Home and Garden DIY Tagged With: decorative tiling, heirloom white, laying tile, motel nightstand, nightstand makeover, sherwin williams, small tile jobs, tile adhesive, tile cutter, tile grout, tiling supplies

7 Ways with Wildflowers

June 3, 2016 by Florence 8 Comments

I wanted to share 7 ways with wildflowers in “new” vintage vases that have caused me to break from tradition on bringing flowers inside. I usually prefer to enjoy them in their natural habitat, but I do enjoy them inside when we are going to have guests.


Everything you see here came from yard sales~

7 ways with wildflowers in vintage vases
Grouping in front of “Roman” tin picture
7 ways with wildflowers in vintage vases
Grouping of Glass
7 ways with wildflowers in vintage vases
Grouping on a Sideboard

Which one do you like best? I can’t decide…


I haven’t shown you the “Roman” picture officially yet, but you can see it down below. That’s coming in the next post. I bought the Hurricane Lantern at the Tiny Estate Sale without the globe or wick…I almost passed on it, but I’m glad I didn’t because it makes a wonderful vase, and when I get ready to make a lantern again, I have all the necessary pieces. The opening is large enough for adding marbles for color.


Picture $3. All the little vintage glass bottles $1. Hurricane lantern base $1. Tablerunner $1. White bottle $1.

7 ways with wildflowers in vintage vases
Grouping of Little Bottles
7 ways with wildflowers in Vintage Vases
Seagram’s Whisky Bottle Vase
7 ways with wildflowers in Vintage Vases
Whisky bottles are often quite pretty in design, aren’t they? I bought this for $1, painted and distressed it.


When I have my supper club over, I like to decorate with small bottles and little vases so we can see over them to talk. They add a sweet touch to a table.


Here is another arrangement I like which can also be used on a table…

7 Ways with Wildflowers in Vintage Vases
The little glass bottles fit nicely in the spice rack.


All the little bottles fit nicely into a wooden spice rack, which I painted with my own mix…what I call “Beach Blue,” which I created by mixing white with bright blue.


The spice rack had been in my Etsy shop for 4 months like this…

7 ways with wildflowers in vintage vases
The dull brown spice rack


If it doesn’t sell in that length of time, it usually gets a makeover, if possible. Do you like the change? I certainly do! Let’s hope it sells with its new look!


7 Ways with Wildflowers~

  1. Flowers in 4 or more little vintage glass bottles
  2. Flowers in a painted and distressed Seagrams Whisky Bottle or any other decorative bottle
  3. Flowers in front of a dark background like the tin picture to highlight the grouping
  4. Flowers in front of a mirror to reflect the grouping
  5. Flowers in a vintage hurricane lantern
  6. Flower vases in a wooden box like the spice rack or any other wooden box.
  7. Flowers in short vases on top of a colorful tablecloth and placed along the length of a table. If you had enough vases, you could also place one in front of each place setting for each guest to enjoy. I’ve always wanted to do this, but never had enough small vases.


The Wildflowers~


Let’s talk about the wildflowers! These are some of my favorites in arrangements because they last several days. Everything I know about gardening I learned from my mother who learned it from her mother.


The white flowers are Yarrow. I just discovered a pin by Amy at Tenth Acre Farm with some interesting info about Yarrow.


The pink daisy-like flowers with big centers are Pink Cone Flowers of the Rudbeckia family. Black-Eyed Susans (another personal favorite) are also in this family, but aren’t blooming down here yet.


The other reddish flower with a tubular bloom is a Dutch bulb which grows all over the place in my yard (Zone 7). It’s quite pretty, makes a nice cut flower, grows so well and spreads, that my hubby is trying to get rid of it. It’s a losing battle because I like it! Of course, I can’t remember the name of it.


I have seen so many creative uses for flowers on my favorite blogs. I would love to hear your ideas!


Filed Under: Home and Garden DIY Tagged With: painted distressed bottle, repurposed spice rack, using a hurricane lantern as a vase, using a whiskey bottle as a vase, using unusual bottles for vases, vintage bottles as vases, vintage vases, wildflower arrangements, yard sale finds

  • « Previous Page
  • 1
  • 2
  • 3

I’ve Been Featured…

ive-been-featured-link-party-buttons
oh-my-heartsie-girl-wonderful-wednesday-button
snickerdoodle-button

Beezer…Over the Rainbow Bridge 2017

Vintage Southern Picks on Etsy

Vintage Southern Picks on Etsy

Everything Square Dance & Western on Etsy

Everything Square Dance & Western on Etsy

© 2017 Vintage Southern Picks | All Rights Reserved

Disclosure: Some of the links on this website may be affiliate links. When you make a purchase from these links, I earn a small commission.